
It seems to be true that even though a picture is worth a thousand words, even so, a photo just does not do justice for representing an oil painting. This painting is coming alive but when I see this photo, it looses vibrancy and spirit. Well, it is my best effort to show you how this is coming along.
the work is slow going because of the medical issues and now even social distancing! I had a sweet visit with my granddaughter outside on the front porch in cold, rainy weather in order to guard against any possible introduction of corona virus. She got here from Ohio last night where she works at a huge public place with hundreds of different people daily. She is not ill, nor are we, but Pappy is supposed to have surgery to repair a hernia on Friday and we are trying to avoid carrying anything to a hospital Environment. I don’t think all this is necessary but we are trying to do our part to protect everyone until we know for sure what is happening. It isn’t good for humans to distance in these ways but we may be faced with a situation that is beyond anything our generation has seen before. Stay well, be safe, remain calm, and may God bless us all. HalleluYah!
Category Archives: Blog
A little more today

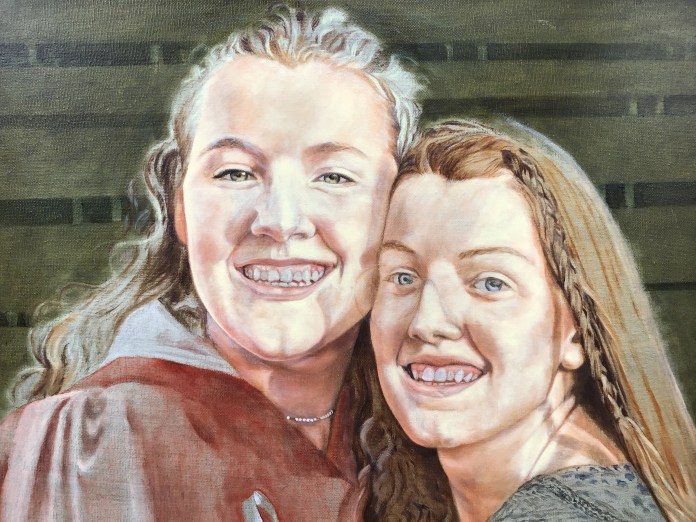
I think I will title this ‘Painting Sunshine’. Even though it is not very apparent, I actually did quite a lot on this today. I repaired and refined a lot of the features, I started laying in the hair patterns too. The daughter on the right has hair that shines red in the sunlight and the one on the left shines blond. I really love the hair patterns and the shadow patterns on the faces. I darkened the background but I will get some deeper color in this. I have always loved this image of my two youngest and I have duplicates being painted at the same time. I switched to this painting because the ones I have been working on are difficult and they have been getting me down. This one makes me really feel good. Hope it continues to turn out well.
Restart
")
flat early attempt.

beginning to see the sunlight
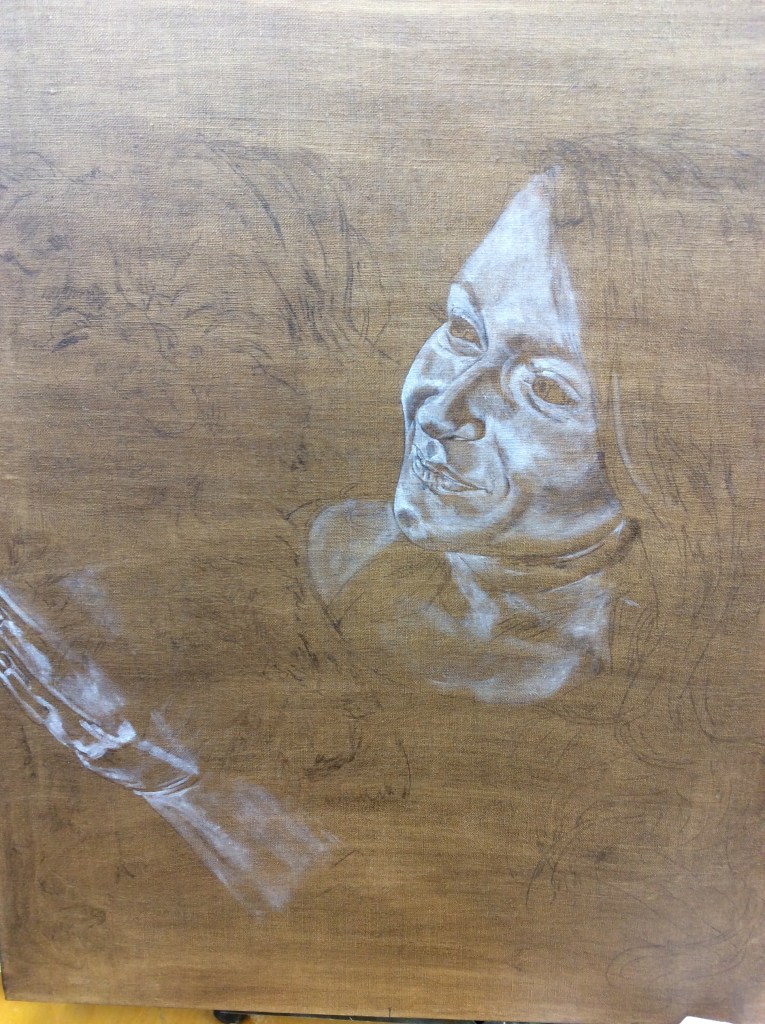
Here is a portrait that has been sitting in my studio for quite a few years. At the time I was working on it, I thought I was making pretty good progress but now that I have begun again, I am surprised at how much my process has changed. When returning to a painting, I do not oil out. Instead I mix a transparent blend of the flesh tone I use as a base and a lot of Grumbacher Gel. Layers of this make a skin tone glaze that builds up the depth and gives me a surface to work on. I then take white or in this case, Naples Yellow Light to sculpt the brightest features and begin the formation of the skin layer. This is how the three dimensionality is created. I have shown some of the earlier process in other paintings that I have placed here for demonstration, so I am sorry I don’t have that in this case. I will use some of the same techniques as I proceed. I am working on three or four other subjects so there may be some space between my posts on this one. I hope to get back to a more productive schedule. Asking for your patience, Diana.
Depression and worse
I just want to tell you that our family has been blessed to have learned about a treatment for my grandchild that is the first new development in the treatment of mental health disorders in years. My granddaughter had a miraculous response to the first of the six treatments. There is no way I can express the changes. Those of us who have experienced this painful journey also know that until now, we have been offered no real hope. I just want to encourage you to do your research. Look for a clinic that has good experience and good results treating with psycedelic drugs. There are a number of these drugs that are promising. My search began with Johns Hopkins testing with psilocybin but the drug in our case was ketamine. We learned that it does not medicate but instead actually repairs the area of the brain that has shut down. It gets the neurons and dendrites functioning. Find a qualified doctor. If your insurance doesn’t cover it, save your money. It was worth it in our situation. I hope you find it beneficial for you or your loved one.
Hi, Friends
It has been a busy time here in PA. Bruce is recovering from surgery and he is not back one hundred percent. I am doing better with the circulation in my legs by wearing the compression stockings. I am having some trouble formatting this page. Sometimes it is a complete mystery to me. Today, the words and images are giant size. I will not say much just in case this is all transferring to you in this strange format. Anyway, I have been working on three or four paintings that are in progress and I have found everything to be causing me trouble. I don’t usually have creative block but there is a lot of stress right now. It seems to be interfering with my work. My sixteen year old granddaughter has been dealing with anorexia and now she is suicidal. Of course her family is trying to get the best help for her but this is not an easy task. It sometimes feels as though a nightmare has taken over all of life. Even in dark times we continue to have faith. I hope to be making progress in my work soon and then I will post more regularly. I wanted to host another class but things are just too stressful at the moment. I have posted a photo of my orchid blossoms that continue to cheer me in the white haze of our first real snowfall. I hope to make more connection with you with my art as soon as things calm down. But it looks as though this show season will not be as active as some previous years. Also, I noticed, that I have had some recent viewers in China. My prayers are with you as you struggle against this mighty attacker virus. I pray for the plague to be stopped and the affected ones to recover and also that you will have the supplies you need to survive. For now, shalom.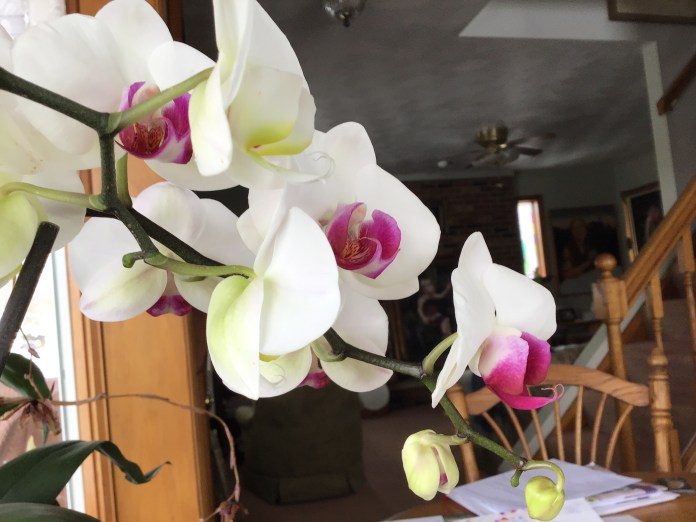

A new day
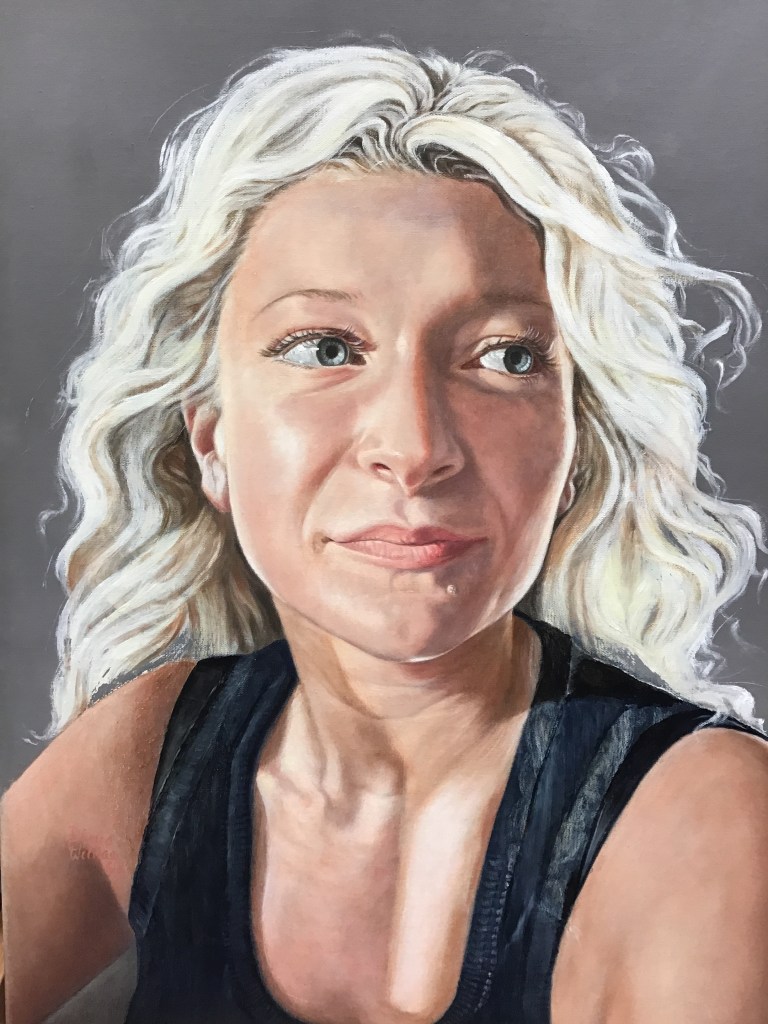
I will add an image later. Right now I would like to catch up a little bit. My husband Bruce has had some health issues which involved blood clots in both lungs. This led to the discovery that his thyroid was quite enlarged. His doctors have been watching this for a long amount of time. It was decided that a complete removal of the thyroid would be the best treatment but the timing of that was adjusted because of his need to stay on blood thinners until the clots were safely under control. Finally, his surgery was done in Pittsburgh with only a quick hick up when his blood pressure dropped for an unexplained reason. The nurse called a code which means that every doctor and nurse available was at his bedside instantly. They administered a bag of IV fluids and did an EKG but all seemed normal. There have been a few other challenges this fall but everything is calming down. All this stuff has interrupted my normal painting schedule but I hope I can get back into a routine. A lot of my artist friends have asked for a class to review the portrait techniques. I am considering that but if I do it, I will have to get it set up quickly. I have so much less energy and more trouble breathing. It is not like asthma, it is just that my heart doesn’t have the energy to push oxygen and talk too. I think I may try anyway. Soon I will send an inquiry about how many want a class. I am working on a number of paintings, even thought the progress has been slow. I seem to be improving some of my skills so that I move through some of the steps a little easier so that is good for me. I have so much I would like to do. Well, thanks for being patient through this slow period in my blog. I will get on my ipad and post a photo of my self portrait. It is very instructive to do a self portrait because you know your own image so well, if you make a mistake, it is obvious. Then again, we may not see ourselves as others do. By the way, please check out the web sites of artists you know of, they have such good information that can give us ideas and help our development. Try Cesar Santos and Andrew Tischler. I will get that photo up in a little while. Diana
Something a little different
I always wanted to paint these beautiful thistle blossoms. The humming bird moth, a type of hawk moth, showed up to help add interest. A good friend with Scottish heritage was expecting a first child so I determined this painting would be my gift for the baby. I am glad they were pleased with it. Before gifting it to my friend, I had it professionally photographed in order to have Giclee prints made. I have them available for others of Scottish background or even if they just like the painting or thistle flowers. It was a detailed and tedious painting. I used a specific mathematical formula called a root rectangle to lay out the arrangement. Hope you enjoy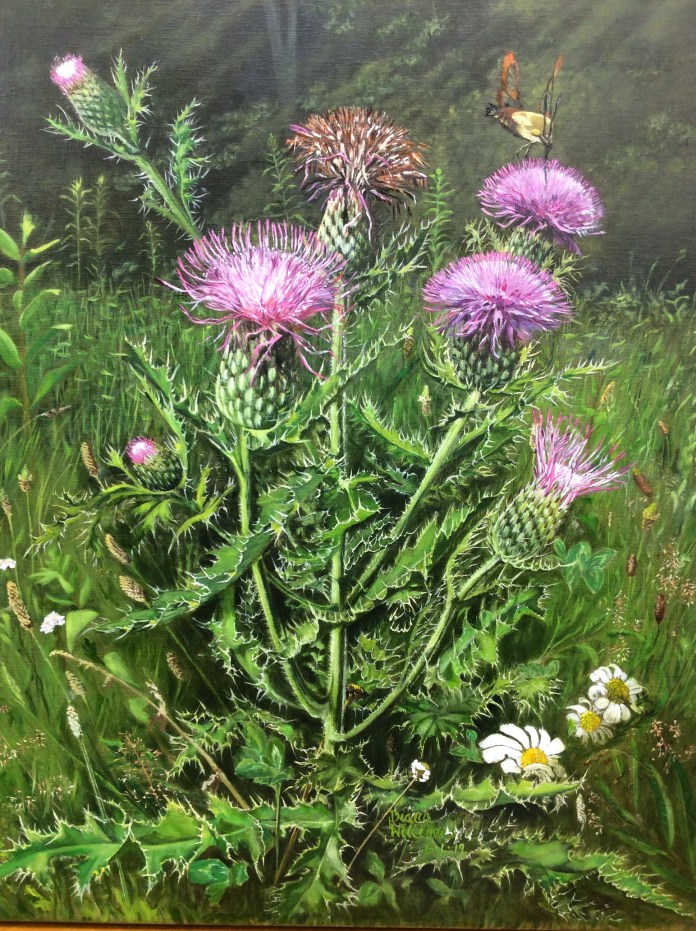
Deciding what’s next
This can be complicated, even at this late stage. I will list some examples of things still needing addressed.
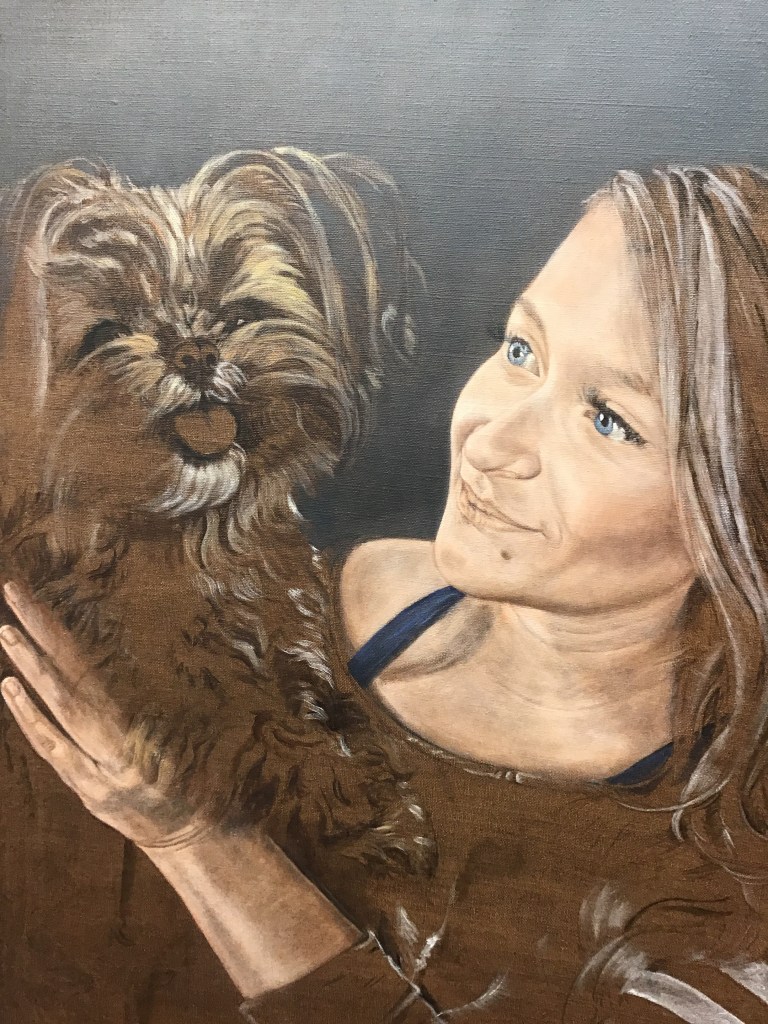
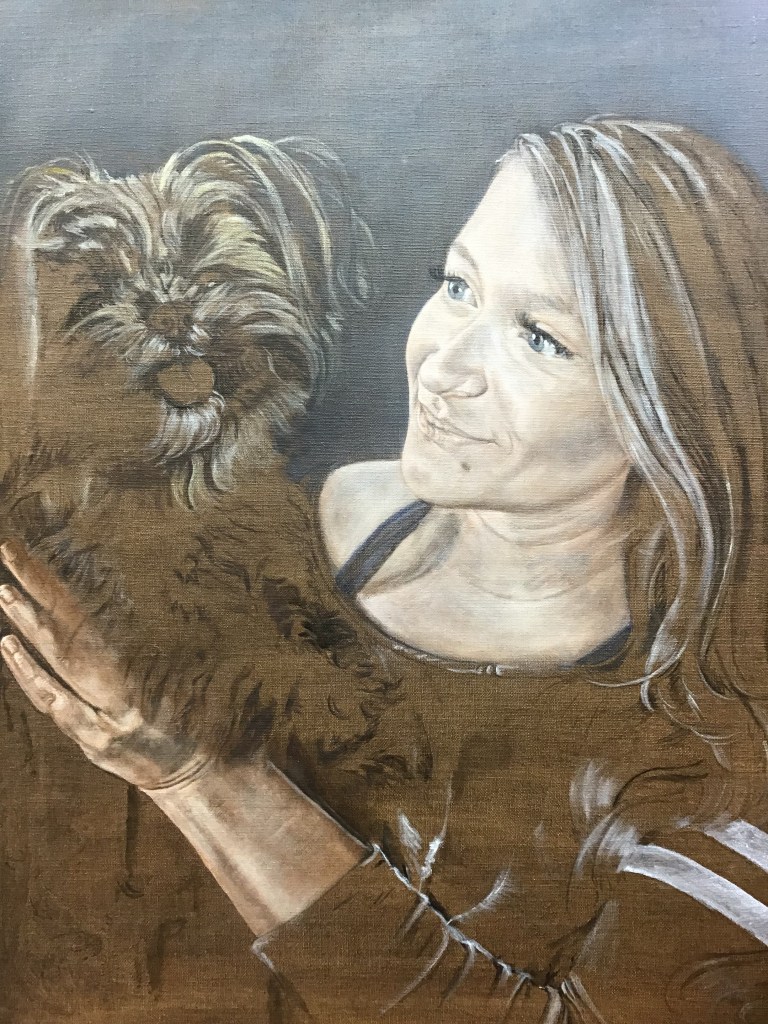
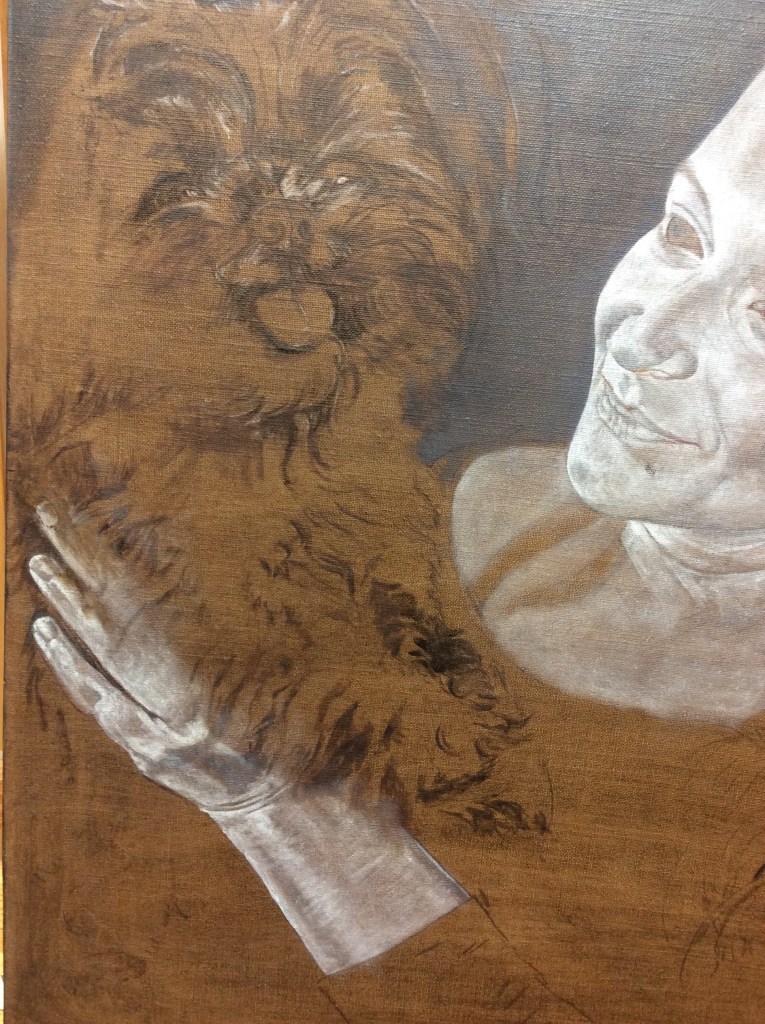
Maisie’s fur may need brightened but I will wait until other surfaces are complete. The flesh on the subject will be modified with several layers to give life and depth to it. I may add some details to the shirt. My granddaughter’s hair will be painted on top of the shirt. And the dog’s tongue will be finished with a brighter pink. This adds up to several days more work. Keep tuning in to see the final stages of this portrait. I hope you have gained in experience and technique. Diana
Continuing work on Caiti and her Maizie pup
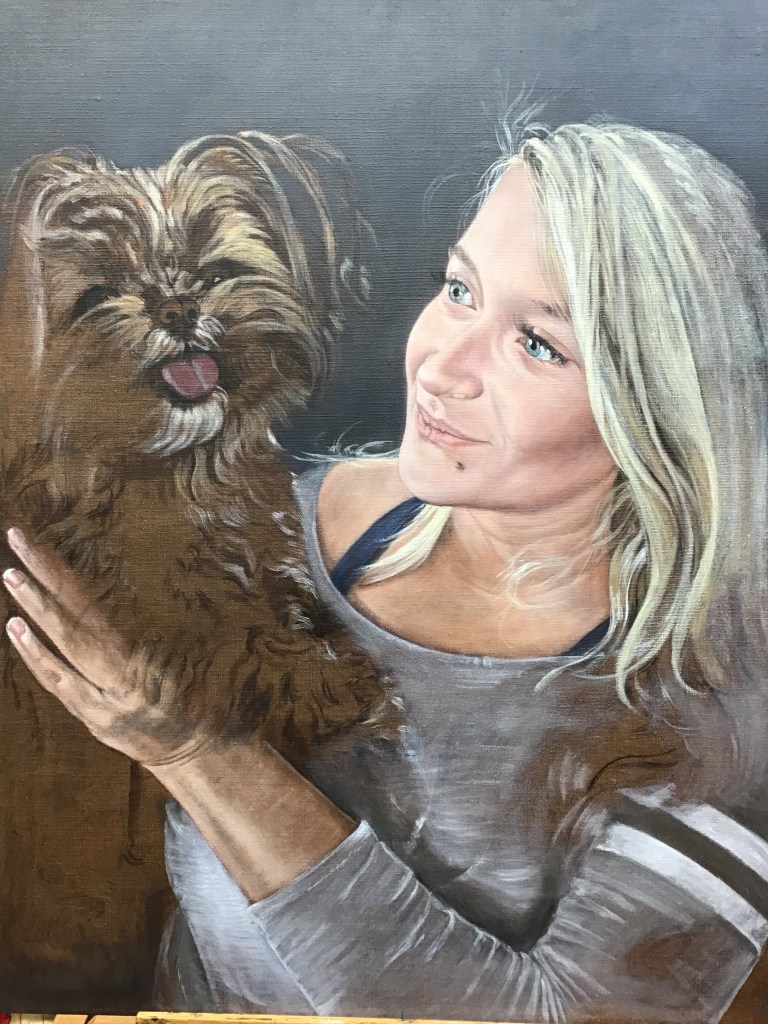
Then, I must complete the hair, the shirt and also emphasize the deep darks in the recesses of folds and other depths to enhance the three dimensional look. Today, I want to work on the dog.
Award for 87th annual Allied Artist’s exhibition at the Pasquerilla Center at UPJ in Johnstown

This painting of my granddaughter, which had been hanging in my studio un signed for a year, had not developed well so I painted another layer on it and totally repainted the hair. Finally, it seemed acceptable to display. I have already started a better one.
Now the life awakens

Just a little work


Keep in mind, my posts will be sporadic while our loved ones are visiting and also during some medical procedures. Even this post is rushed, sorry.
A forty year wait
There will be some time between posts for a while, please forgive the delay. Just use the time to practice the steps so far demonstrated. I am expecting a very dear visitor whom I have not seen in a lifetime. An event in her life caused her to loose all her contacts and we could never find her in all that time. She is coming with her adult daughter and I am not sure how much time she will be able to spend with us. I have been racing to get some work ready and entered in shows. I have not had the drive to work passionately since my sister in law’s illness and death and again last week a monumental Friend died. I am deeply grieved.
Even so, I am working many hours a day trying to get these works ready in time. First, I will show you the latest work on my grand daughter’ painting.
well, keep in mind, I won’t be checking in for up to a month and then Bruce will have another surgery, which could be quite serious. Don’t give up on me. I will get back as soon as I can. Shalom.
A note fyi


Today’s layer
A second thought for today.
Yes, I have a method, so, you would think this process would follow along the routine steps and I would never get lost. WRONG! Perhaps I just forget something, or maybe I decide to skip a step, or maybe something just doesn’t seem right. I have messed up so badly at times that my only option is to call the mess I have an under painting and drop back to square one. Then again, maybe I don’t know why something isn’t right. What I want you to think about and understand is that you must trust your ability. And, I believe in a higher power and I ask YAH to intervene. This gets me on the right track and I come to understand what move to make next. Believe me, if your flesh tone looks blotchy, do another layer and then another. Each time you paint this face, you get to know it better. What you may not realize is that your brain is learning how to paint suppleness into the skin. You don’t need a teacher except to help the process move along more quickly. What your brain needs is failure and experience. This is how we were meant to learn. Get the point I am making here, please. Your brain is gaining mastery as you try to figure this out. How else could I have learned. I looked and I tried and failed and began to recognize my own improvement. Don’t give up. I am grateful I kept trying.
Refuse to become frustrated.

Beginning the flesh layers
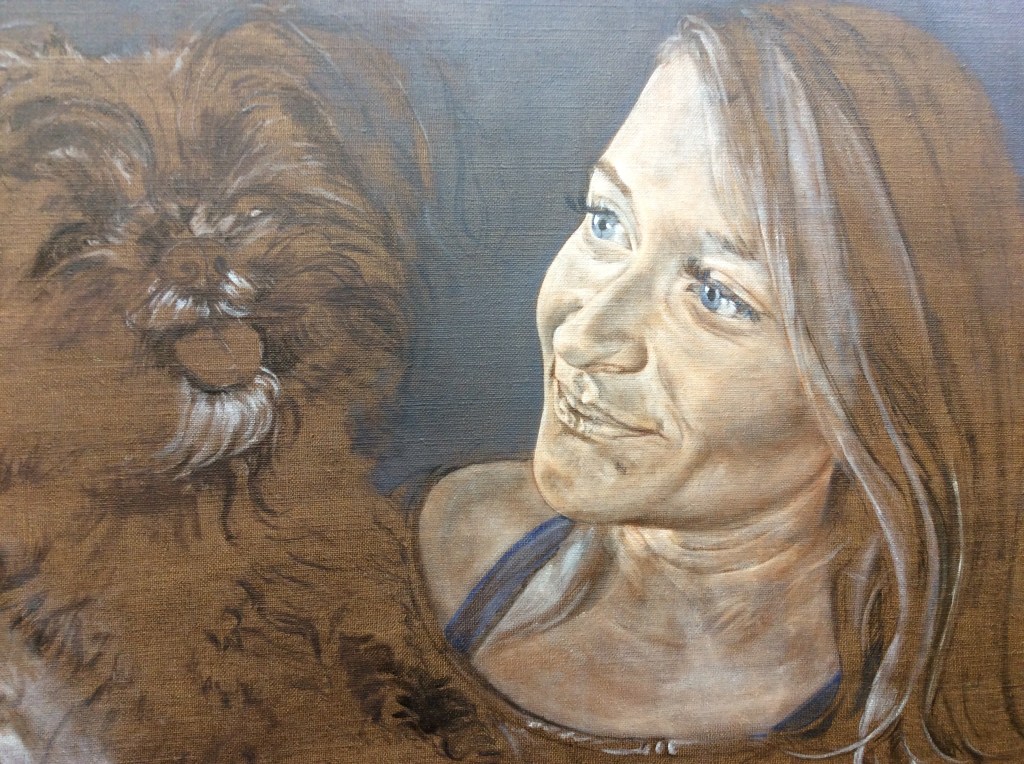
Now that the likeness is more established, I will begin to add darks to bring out some of the details such as wrinkles in fabric, deep bends in body, for instance elbow and fingers, and I will plot all the darks of the hair and the pup’s fur.
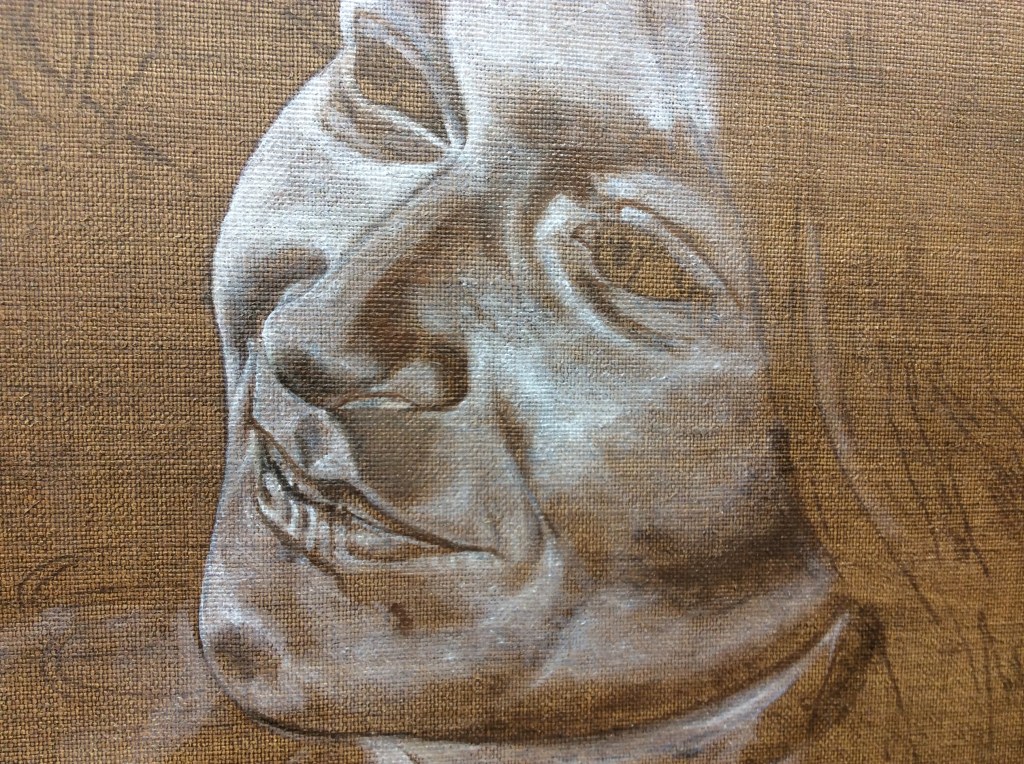
Take notice that I have not painted in the eye lashes with thick dark paint. Later when the portrait is almost complete, I will use a transparent dark for the lashes. I always recommend using a transparent dark even for very dark lashes. It just helps make them seem more natural.
People often ask how soon till the portrait is finished? It would take a very long time to list all the work that must still be completed. No one gets it. A puzzle can only be put together one piece at a time and a portrait is sort of like that. Today, I can only put in the next piece or two. How can I ever let you peek into my artistic mind and let you see what must still happen. If I sew a dress, I can show you the pattern, the fabric and explain the steps of putting it together. It is similar with a house or a piece of furniture. But how can a sculptor tell you how to find a body inside the stone? I might be able to tell you the basic steps to a portrait but never explain the finesse necessary to make it a masterpiece!
Perfecting the image

Always step back and ask, ‘is anything wrong?’
Painting other areas
When you come to a place where you cannot do more on an area, often you can go to another area of the painting if it won’t cause difficulty with the work you have just completed. Take notice of the background color in the area of the pup’s ears. The background color must be behind all those separated strands of fur but I certainly don’t want to paint between each strand. If I choose to do this background before the final layer of fur is painted, I can paint right over everything. Then, later, when I apply the last top coat, it will look more three dimensional and the fur will look real! Also observe carefully that I have done more adjustments on the features and skin texture. I tell my students, ‘portrait painting is the art of constantly making corrections.’
When I come back to this in a few days, I will probably add the first layer on the eyes, some color on the clothes, the darks on the hair and the fur and then I will start adding the many layers of flesh tone. A painting this size is often priced beginning at $25,000. Is it any wonder?
Beginning again, so it seems.

Look carefully, don’t overlook the small stuff.

Look
Tiny refinements
Half paste and brights
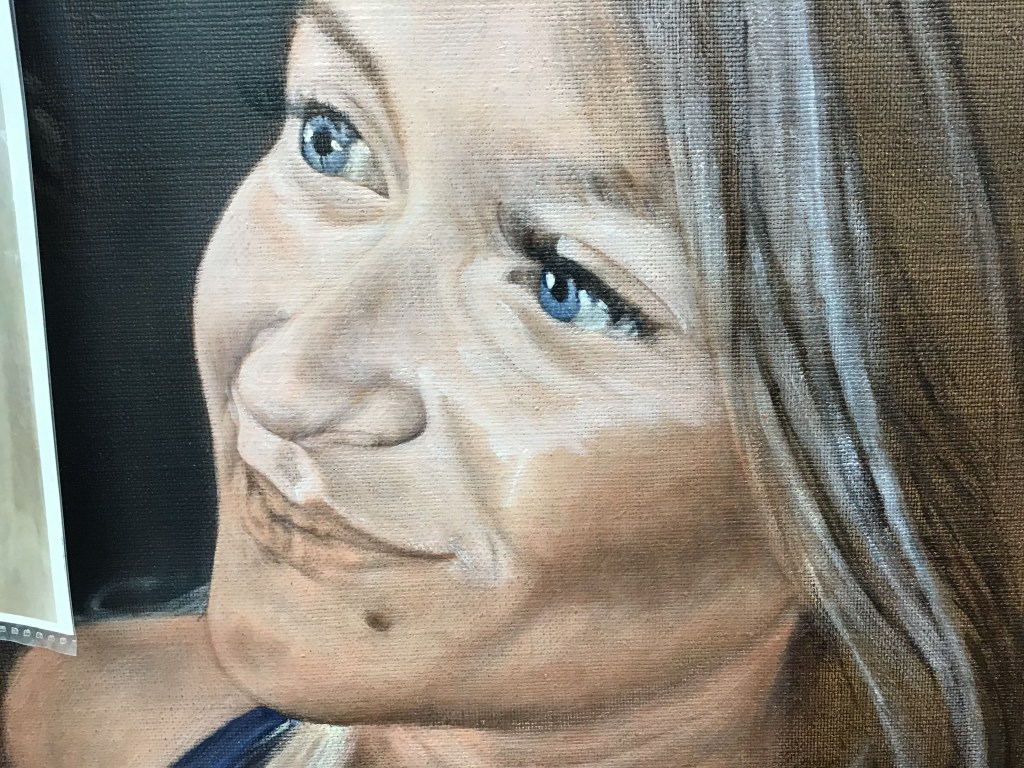
Here is where the likeness, the spirit and the mood are begun to be captured. This is an important and exciting stage of portrait painting. You must be able to see light patterns and shadow patterns as well. The more refined your ability to paint these patterns, the more precise your work will be. I do not seek to achieve photo realism but I do see beauty in and appreciate realism.
First the darks, then the brights.

Transferring the sketch


The sketch

If you have drawn a small sketch and want the painting to be larger, or if you have a small photo and want to make a larger sketch to paint, then you should learn how to do a graph or grid for this purpose. You can find videos and explanations of how to do this on the internet. I will tell you the basics. Always start by finding the center. Find the middle from the long and short sides and draw a straight line both ways on the photo or sketch. Where they cross will be the center. Precisely measure one inch from these lines and add more lines in a checkerboard fashion, being sure to always double check the measurements. Now decide how big you want your final painting to be and make the distance between the lines increase by the correct amount. For instance, if your sketch is 8×10 and you want your painting to be 16×20, then the distance from one line to the other will be two inches instead of the one inch you started with. You can see that I also connect the diagonals too.
Now look at your original photo or sketch. Starting with any feature, draw on the larger graph a mark in a square or triangle that exactly matches the smaller one, just remember to make it the increased size. If you are careful to follow the pattern and not confuse the placement of your marks, then you proportions and likeness should be good.
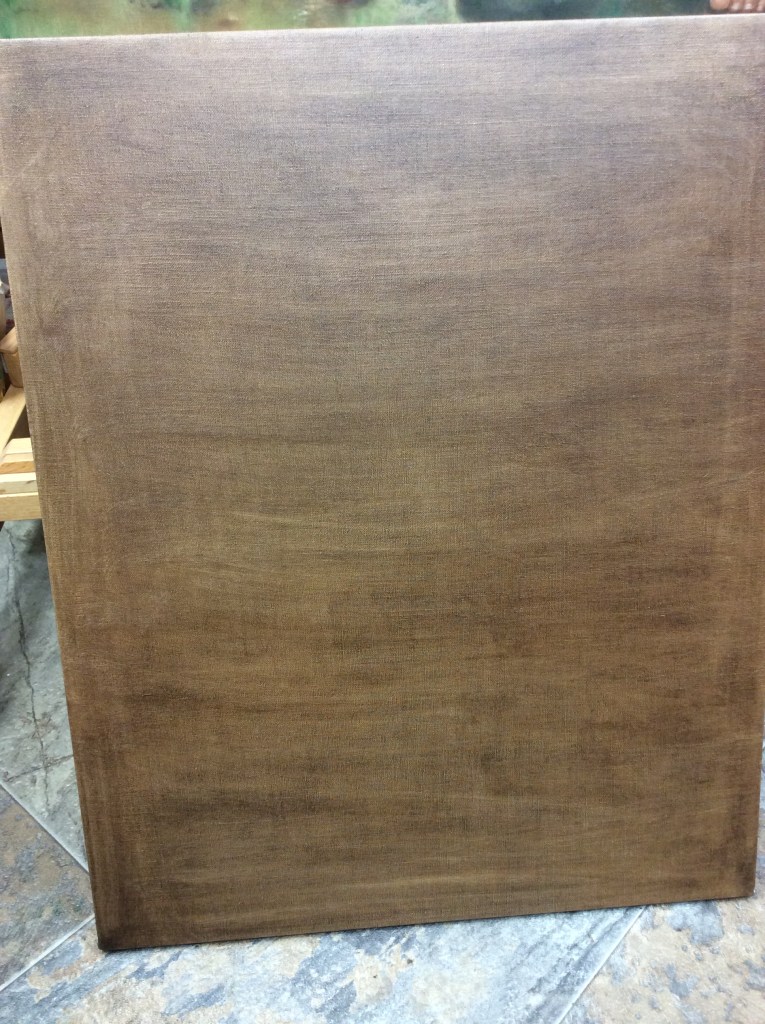
Wiping down the under coat.
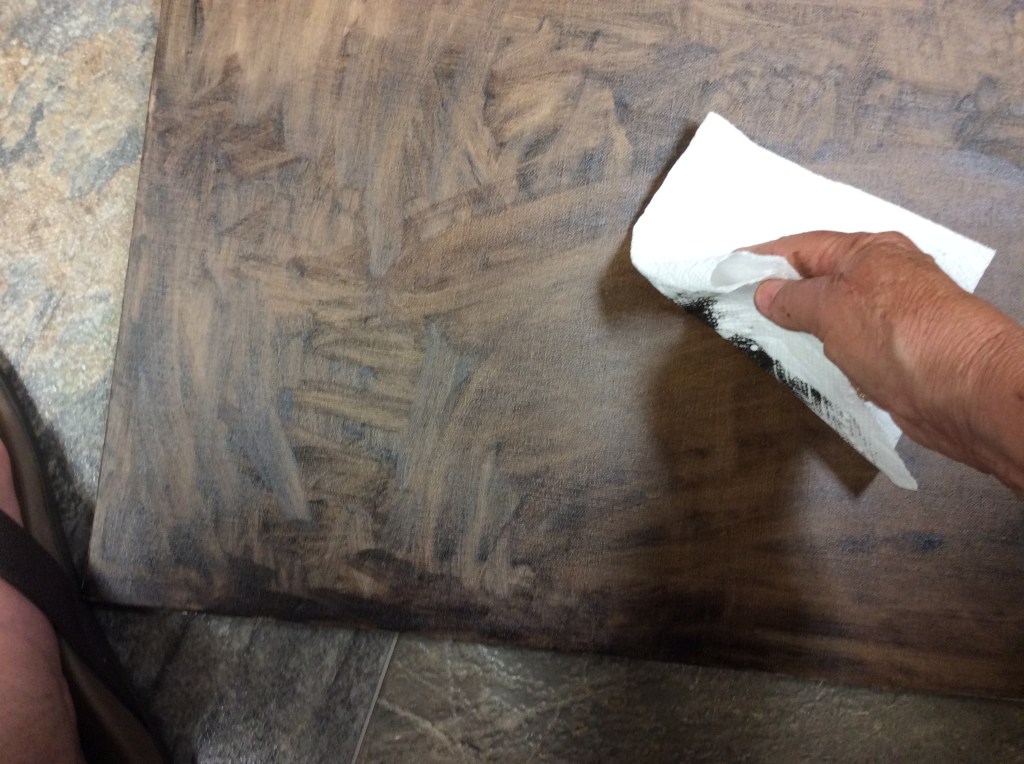
next we will use the same paint mixture, burnt umber and French ultramarine blue, to transfer the sketch. In my next blog I will talk about the sketch, a little about how I use a grid to achieve correct drawing, and about the transfer process. Keep in mind, all the colors and methods can be modified. I don’t give you rules, only helpful suggestions.
