

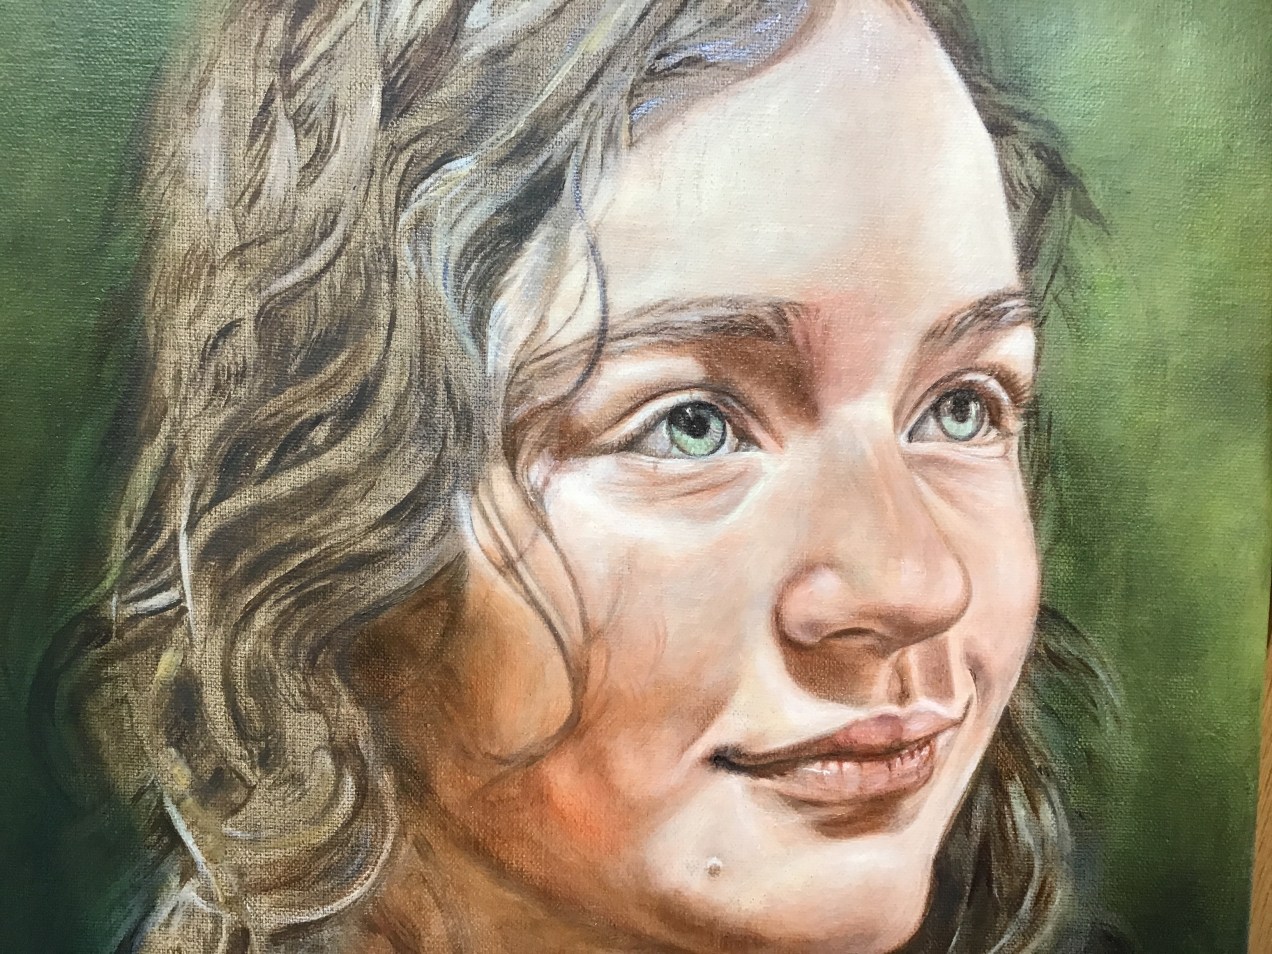
As I add these photos, one might think they are all the same. They are developing though and a portrait artist begins to have a sense of what comes next and also what must be done first. Try to remember those quizes in school where you had to arrange a group of photos or objects in the proper order.. So that is what we do here. If I am able to make this work, i will add another photo to give you a better visual. For now, i added more detail in the hair, the eyes and lashes. This image has a lot of life captured in the photo, It is my job to not lose it but to paint it so it is in there. Happy painting. ill post the other photo later.
Category Archives: Blog
Refining details
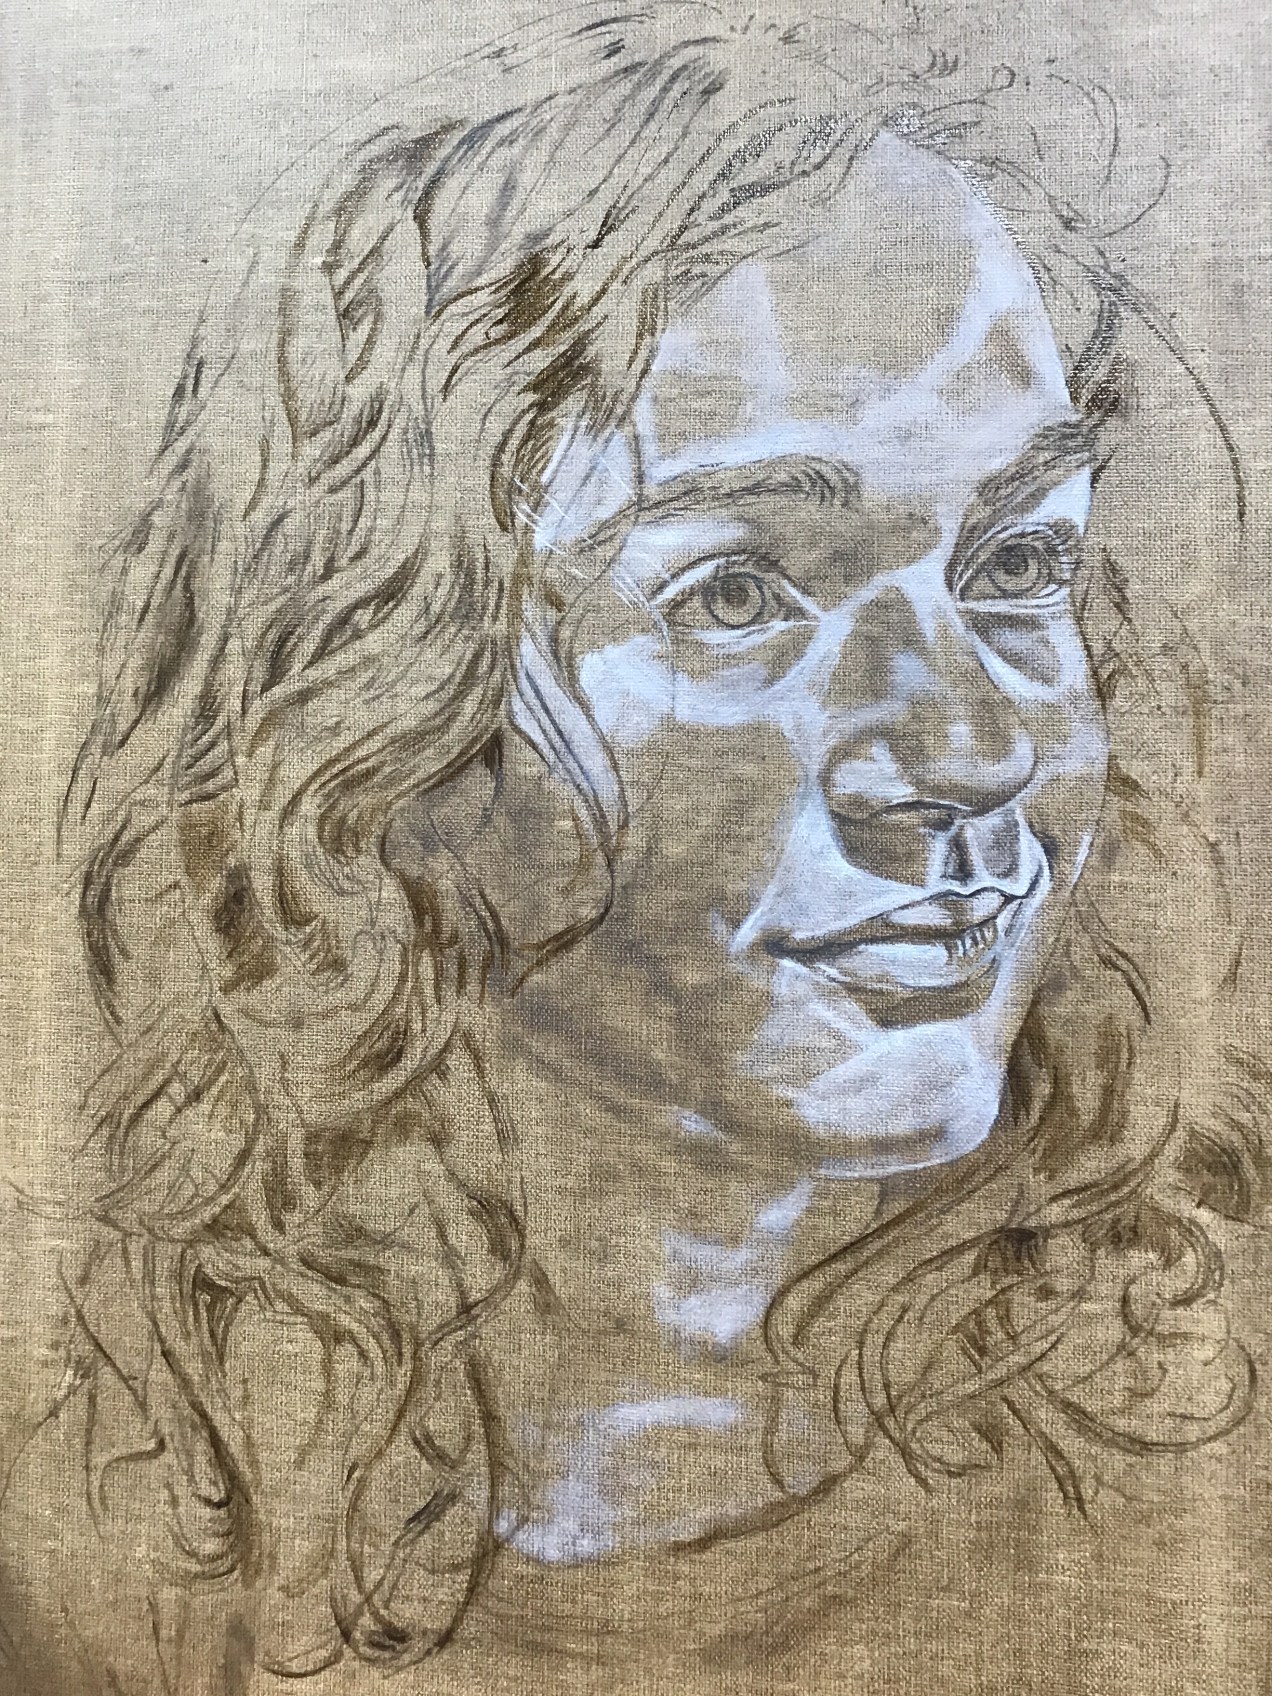
Today I applied a gel/flesh mixture and buffed to renew the painting surface and deepen the skin. After that, using a tiny filbert sable with a good point, I methodically went over a lot of the details. Students ask, ’what first?’ but that must be decided by the artist and sometimes dictated by what simply must come first. I would never paint the dark pupils and then go back to add the iris details. Yes, it could be done, but it seems to make sense that the dark pupil would go on last. I indicate where it should be by painting an under layer in an earlier step, but that last dark layer finalizes it all. I tell my students to let everything dry before that last mark so that it can be taken of easily if a mistake is made. When an artist is more confident, then they move ahead as they trust their decisions. I will still add more darks in the hair shadows and lift the brights of the flesh even more. At this point, my focus is on the likeness which can be a minute, tiny mark to bring perfection. Note the tiny hair shadows on forehead and cheek and the changes in the background color. Soon, I will play with the hair, which my granddaughter insists must be blue!!! This IS beginning to have that magic quality. If I allow it to dry over night, maybe the elves will come and make it even better😉 Diana

A Touch of Color
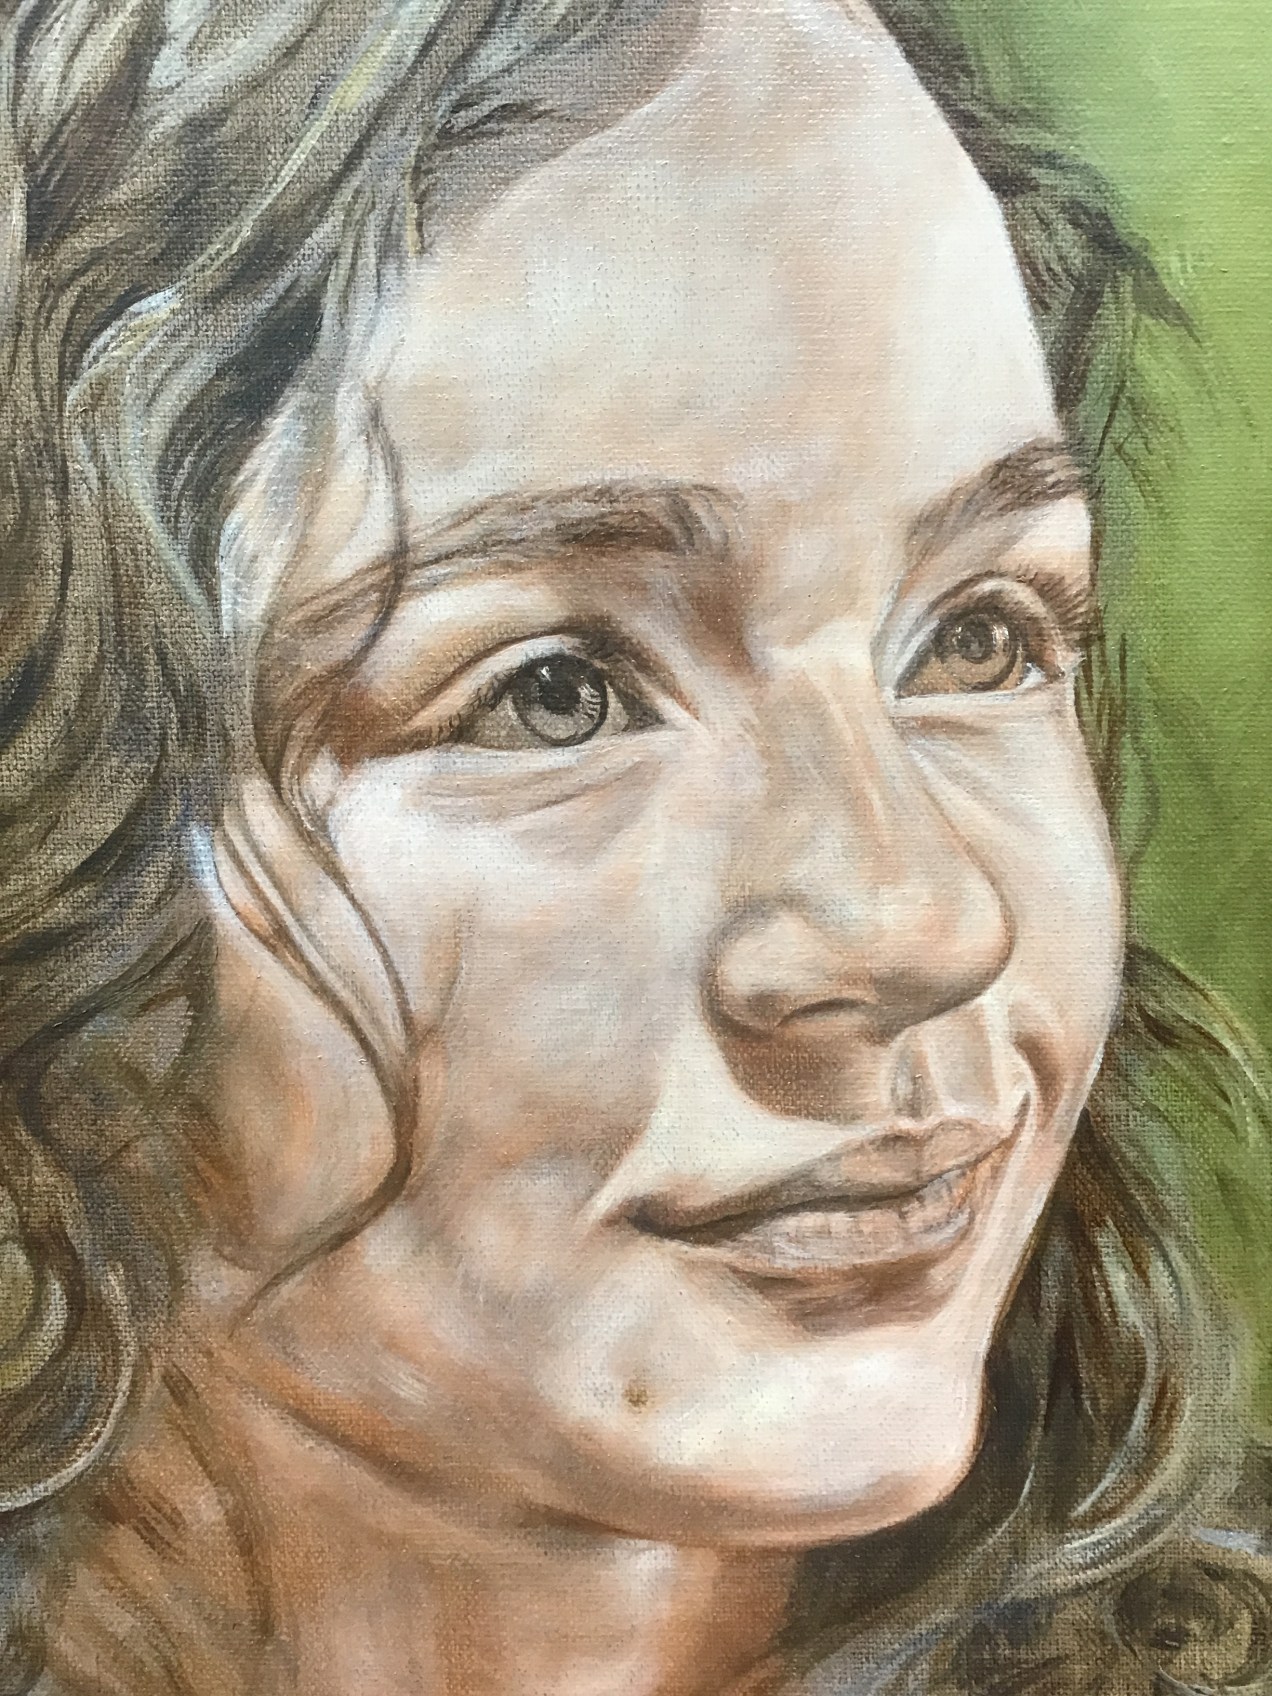
And always corrections. Here I layed down a layer of transparent flesh, then buffed. next I had two reds, one was winsor and the other a rosey hue to match her skin tone. i put these in the forehead, around the eyes and nose, on the cheeks and lips and some in the neck. I also mixed my neutral dark with flesh and a little of the red to darken the skin where her hair shades it. I changed the line of her jaw to take it up a little higher and i refined the eyes with this darkened flesh color. Next, using a soft sable brush I gently applied a whisper of white, (titanium, flake and naples yellow) to the areas where the flesh needed brightened and I was sure to delicately carry this bright over the entire surface of skin. I have seen studies that say white should not go into shadows but in this process, if you do not gently touch all skin, it will appear unfinished, as though the artist missed that spot. It should not look painted white but only a thin film as a thin layer of skin on the surface. For the flesh area, always buff, then allow to dry.
Third flesh layer
I know it doesn’t look much different but it will help in the end result. These layers in between cannot be skipped. Without them, the depth of skin and reality are lost.
Believe it or not
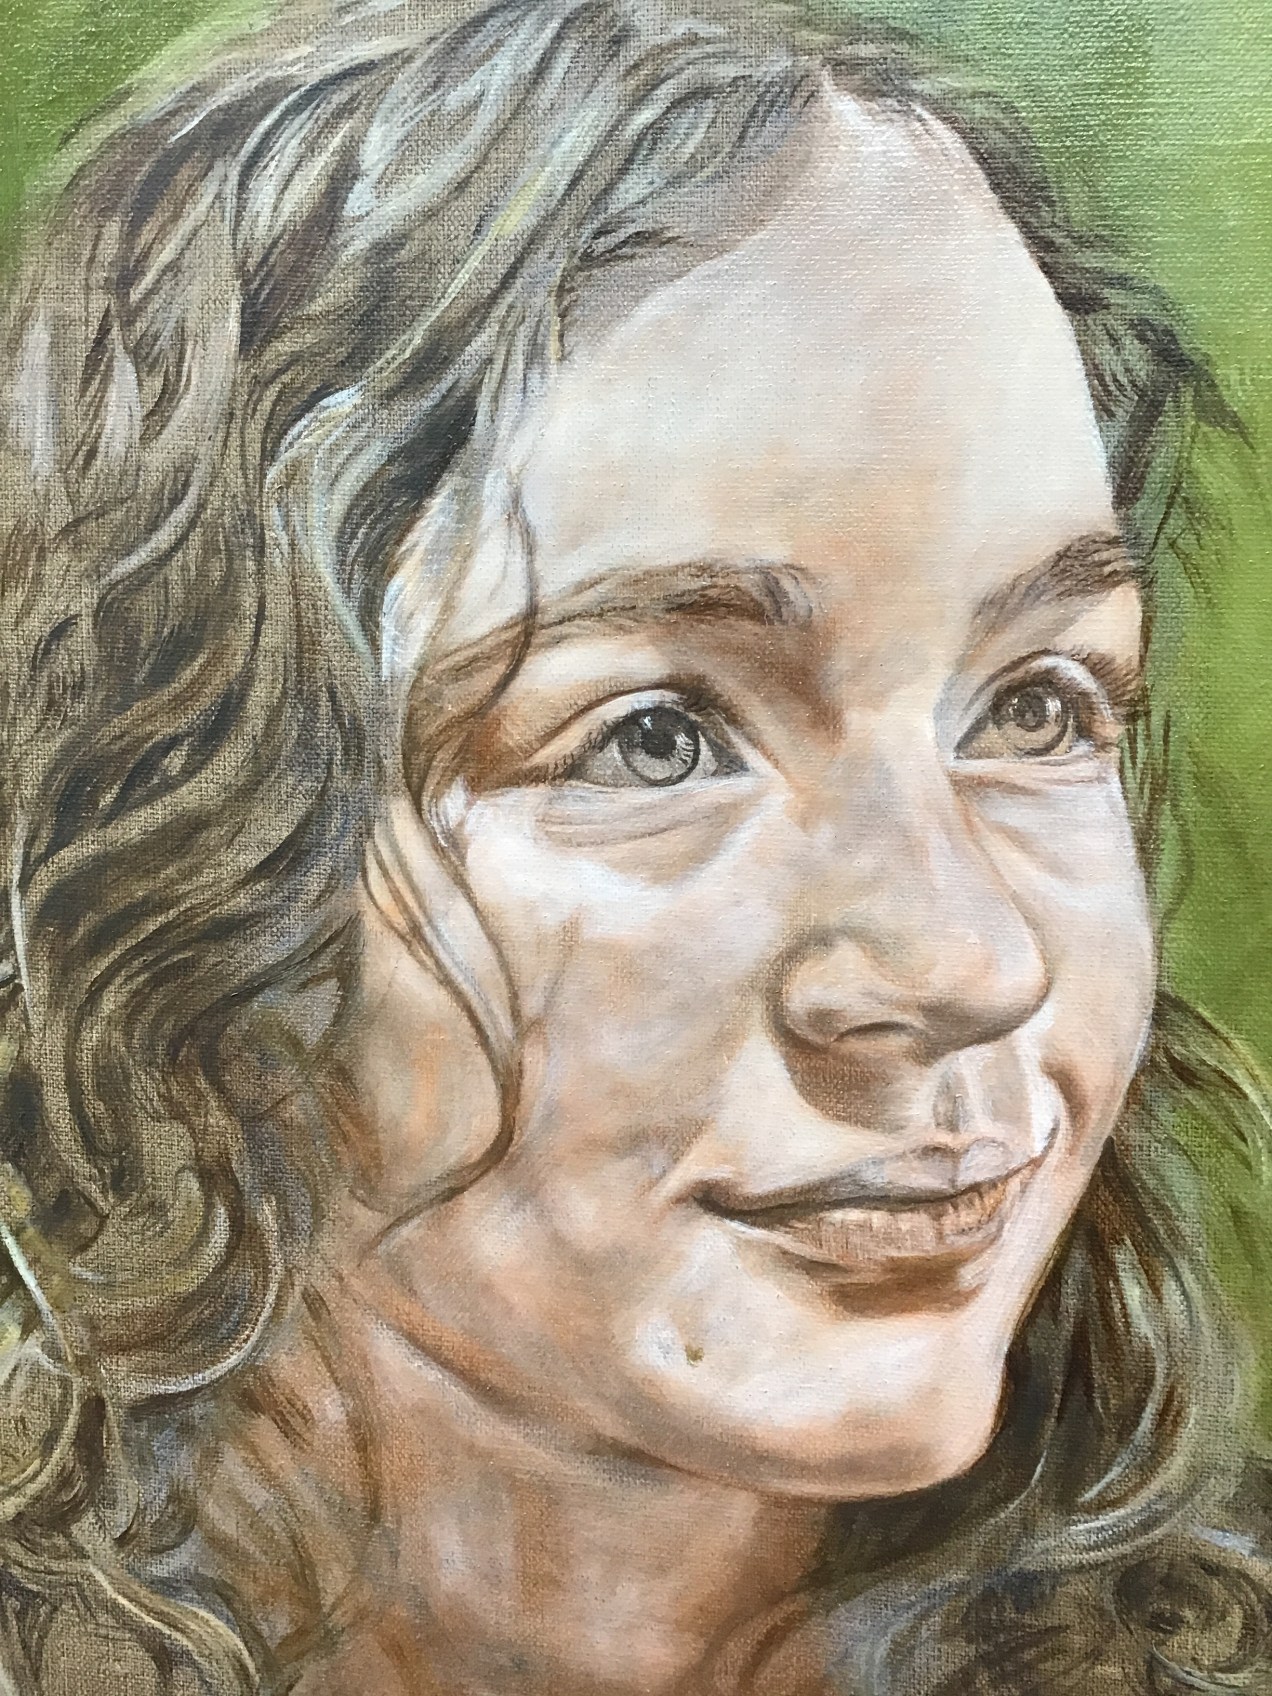
Ok, my post disappeared. I will try again. These layers will, believe it or not, add up to a supple and beautiful flesh. After this dries, I will put in a few details, such as enhancing the shape of the flesh around the eyes and maybe a glaze of color to show thru the next flesh layer. Can you tell i moved the mole? Also, I put some dark flesh tone under the lip to enhance the fullness there. I have no more time. I must go. i hope you enjoy these layers. It goes better if you dont feel pressured to do too much at once. Hugs, Diana

A second flesh layer
Today I began by deepening and desaturating the background color. The colored egg green was too immature for this sophisticated portrait but i use a color for the under layer that will influence the final layer. This must be applied sometimes in an inconvenient timing but it needs to dry before the hair around the outer edge. Now i scrubbed in a transparent but still rich hue of flesh, layering more color in the deeper areas of flesh and less heavily in the lighter areas. Of course, this is buffed to a sheen before carefully painting in a mixture of titanium white, flake white and naples yellow. In this image, i have smoothed and then buffed the areas as I go, to maintain a level of control. Keep in mind, what we achieve in these early layers is not the finished product. The supple skin will be built as we go. Try to make sure that what you accomplish in a layer is correct to the best degree although not finished. Each layer after will add more correctness and more dimension. I will try to post another image when I finish today’s work. Diana
Beginning the flesh
This may feel like a difficult task. We must remember, it is a first layer. After you apply the flesh, mixed half and half with gel, be sure it is spread into the weave of the canvas evenly and then use a fan brush to buff it to a high gloss surface. Now you must decide if the brights are white, yellow, or some other shade. I often use Titanium, flake or lead white, Naples Yellow, or a blend of these,(for Caucasian skin color and sometimes even for darker skinned people.)Apply them by following the light patterns you see on the sitter or reference material. Place the paint with the best sable brush if you have it, or a synthetic. Make the first layer as accurate as you can, smoothing the paint with your soft brush. Then, with a very soft but firm or bouncy fan brush, buff this flesh. This is where you will answer your question, ’How much paint?’. You will learn from practice just how much to apply in each layer so that it can still receive a buffed surface. THE FIRST LAYERS OF FLESH ALWAYS LOOK BLOTCHY! In this method, each layer will enhance the suppleness and realistic look of the skin. Many students are content with two or three layers. Later they comment how real the skin on my portraits looks. This is achieved by multiple layers of transparent flesh. You will learn later to add the richer tones of the skin surface with transparent glazes. These colors may be introduced earlier but each painting sort of sets its own pace. Remember two things; continue to make whatever corrections are necessary and, two, ’if it doesn’t look right, it is just not finished!’. Enjoy spring. Diana

Did someone say ’easy’?
Yes, sometimes I feel frustrated! I love this whole process but when you put in the hours and only have a few hairs to show for it, even I feel overwhelmed. But then I step back and look at the overall progress! That is today’s lesson! Don’t forget to step back and congratulate yourself for making it this far! Don’t just see what you have in front of you. Look at what you have accomplished as a journey and envision where you are headed. I cant imagine painting a portrait if I could not see ahead. Maybe that is what makes the difference between who chooses to paint portraits and who does not. If you cannot see ahead, it could be difficult to continue this journey. I don’t believe that should stop you, though. There have been plenty of times when I did not know what would be my next step. If you get to one of these places, take the steps slowly and don’t allow yourself to blunder forward. Rest, think, pray, and try something. If you don’t go too far, you can always wipe off or paint over. The point, I suppose, is to enjoy the journey, the scenery and experience the lesson. I can see where I am going and I don’t want to hurry to get there. I sincerely hope you are learning something as you make each attempt on this artistic road. Don’t be hard on yourself. I will do the same. Diana

Quick post
I put another layer on the background and then reworked some hair placements, which added a little dark color. it seems like I have worked a long day with hardly anything to show for it. ”Mama said there’d be days like this !” Sorry, gotta run!

Today’s work
Sometimes only the artist can see forward to the final vision. This likeness just turned on for the viewer. i knew it was in there. It isn’t 100% guaranteed but when it shows up this early, an artist has a pretty good feeling. I didn’t have any more time today but I encourage my students to do less, then study, then go back to do another pass. Hugs, Diana
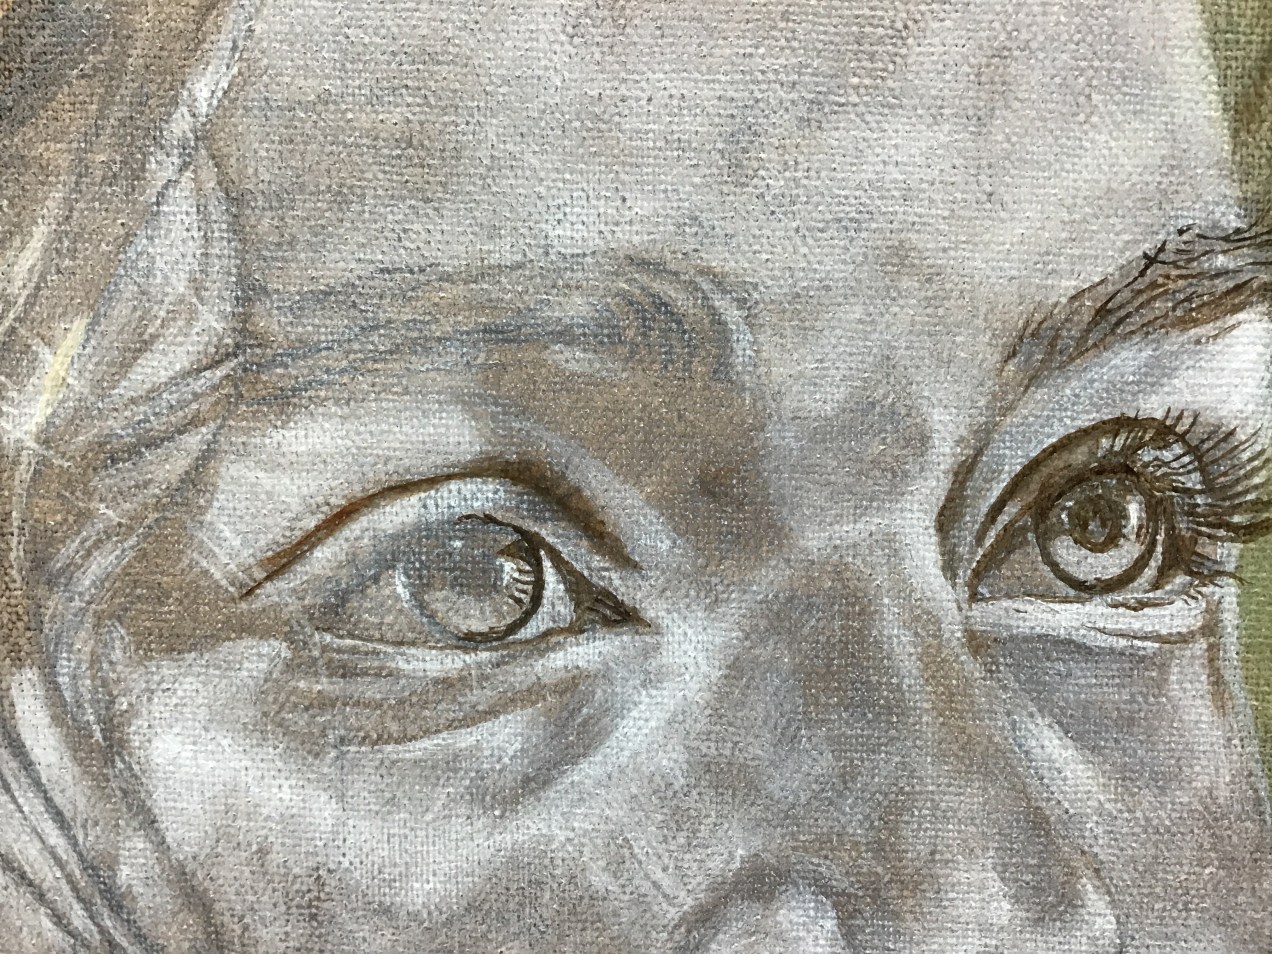
Do you want to capture likeness?
Pay attention to this if you do. What i mean by that is these steps are vital to implement and get right if you are trying to improve your ability to capture likeness and even spirit and mood and personality. Look closely. Remember that first we painted the structure or skeleton of the portrait, the planes and shadows. Then we marked the brights. After it all dried, we overlayed it all with ’skin’ -a half paste of white and Grumbacher gel. Now we begin to perfect the details. You will see the right eye has been refined with shadow and detail. Notice closely how the eye on the left is only partially refined. i took the photo now to help you see the difference. i am using a flesh colored paint with a little neutral dark in it. I am using a fine small round brush to mark hair and thin edges. When this dries, i will probably do a second layer of ’skin’ and then make more refinements. The more thin transparent layers we use, the more supple and real the skin will look. Have fun. Diana

Finesse
This is where the work takes finesse. The artist must train their eye to see patterns of light and shadow. It is one thing to be able to see them and another to be able to paint them accurately. Also, remember, it is a matter of the style and a question of the effect you wish to achieve. I am going for realism and an accurate likeness.
i am using the best sable brush I can get, soft with a good edge and point. The image I chose is unfinished in order to help you see the method of application. Of course you will have to study this still photo very carefully to notice the soft light in the shadows of the Eye lids and under the nose. Also you must understand that every layer will adjust this shadowing and light. If you don’t perfect it on the first pass, it will be refined as you go.
This may be the last post until after the holy days. Till then, Shalom. Diana

Just a little time to work
Well, I was not expecting to do any work on Sophia today because the features on her face should be thoroughly dry before the next step. As I studied everything on the canvas, (always an important thing since it helps the artist learn), i realized i could add some landmarks in the shirt and put a first coat on the background. The old masters studied drapery, folds and clothing for long periods as apprentices before they were allowed to move on with other painting. I approach fabric just as most other things; applying the light and shadows first. You can buff or use a tissue to blot so that you don’t leave too much paint on the surface. Think of this as a place marker or a map to help you lay out the patterns of wrinkles. I enjoy painting patterns, on fabric, hair, water, etc. Be warry of choosing a bright color for a background. Sophie’s skin tones are ivory and pink. I chose a neutral green for the background. I mixed cadmium yellow and phthalo blue which made a beautiful bright green, way too bright or intense. I softened it a little with white, still too bright! Now, try to remember this next part! The color, very pretty, was TOO INTENSE and it needed DESATURATED. I didn’t want the color changed. I only wanted the brightness brought down. So, I added some of my original dark. you could probably use black or gray. Don’t be surprised if at first it looks like mud. Spread it on, making it darker and lighter where needed. You will learn from practice how this desaturated color will look good without overpowering the image. we find our true difficulties arise from going to bright, dark or heavy on our first move. That is all for today. I hope these suggestions and instructions are helpful. Remember, you can always refer to them as needed. Hugs, Diana
First adjustments (corrections)
My students have heard me say, ”portrait painting is the art of correcting”. It just makes sense. if we have the hand and eye to get it right with the first mark, then we should do well from there. Most of us would not be doing this if we did not have the patience and the ability to see minute details. Making a good likeness is usually possible only when we are willing to constantly examine our reference for the tiny details that make us individuals.
Today, I first added tiny adjustments to the brights. They are so small, I doubt you will be able to find them. Next, using the same dark, i marked ONLY the main shapes and deep darks spots of the hair patterns. The marks should not be bold. Even though the color is the same dark that I used for the undercoat, I stress that the marks should be transparent. This is done by the pressure used, not so much the amount of paint or intensity of color. This turns out to be important as we go on to other steps, mostly because we don’t want to fight the dark paint when adding color. Forgive me if I repeat instructions. Learning portraits can be complicated and it is good to be reminded. Also be prepared to adapt and do things in different ways. We must make these decisions based on each situation and every variable involved. I do hope these examples are useful for you. Hugs, Diana

Brights
Every step is important, yes, but with a portrait, it is vital to capture a likeness. So, the artist must learn that the features are emphasized by the effect of light on the shapes of bones and muscles in our face. first we transfer the drawing, then we use the same transparent but dark paint to soften those lines and emphasize both shadowed areas and also certain features like folds, creases and deep places. Always buff, which is done using a soft fan brush lightly feathering over the top of the wet paint in order to remove brush marks and prepare the surface for the next layer. There are other methods of portrait painting and you must decide for yourself which you like best. i have found this one gives a realistic and pleasing finish to the portrait. As you refer to these posts, teach yourself to study closely. On this image, it may seem as though the entire face is beginning to look painted. if you study closely, you will see that it is simply and sparingly painted, first with the darks and now, minimally with the brights. please understand that the more precise you are in this stage, the less difficulty you will have as you proceed. it would be possible to begin the background at this time or work on the clothing, or even some of the hair marks. But, since i am attempting to teach you precision and method, I am encouraging you to not move ahead too fast, rather engrain in your mind the WAY to proceed so as not to end up frustrated and overwhelmed with a feeling of being lost, so to speak. Later, after you are more sure of the process, then you will have the confidence to overlap the steps and work at your own speed. You all have expressed the desire to improve your skills. Every thing I apply in my work was learned from observation, thought and practice. Discipline your artistic process and incorporate your own ideas into other projects. Keep the learning process in a separate compartment of your brain at least until you are finished with the project you have begun, that is, understanding this particular process. see you at the next step. Diana
An extra note to my class
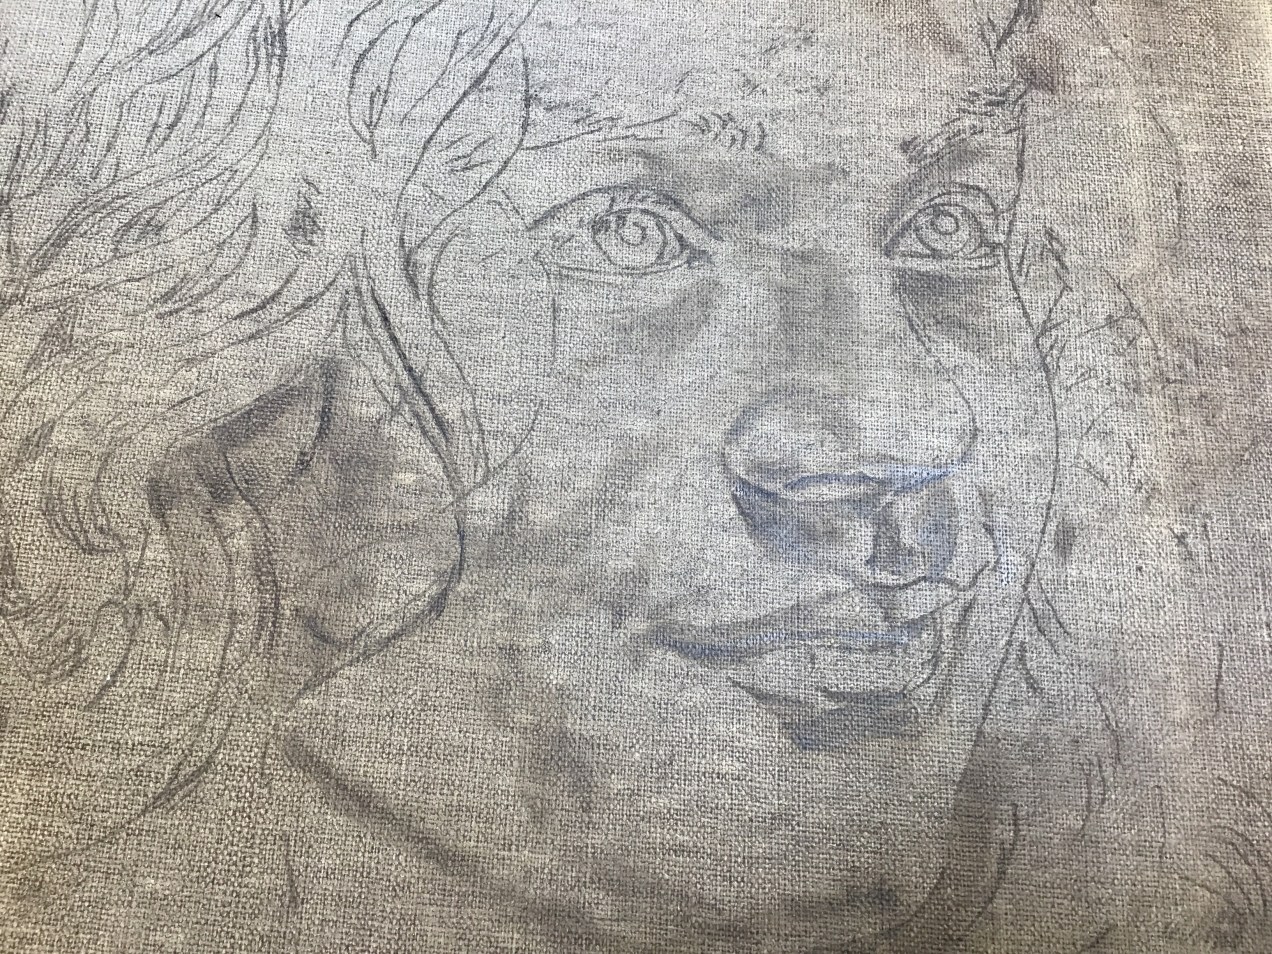
Hi! now that i am not working in my studio or in a hurry to quit and cook for our evening meal, i thought i would add a little more information for you. This stage where the image is transferred onto the canvas but no real work has begun is one of the most exciting stages for me. the reason is because there is so much potential and i have not yet messed anything up! If you look over the transferred image, you can see that there is very little paint on the canvas but more importantly, very little information is there; a drawing, a small amount of shadow and form, and thin, transparent work. Think about it. This is the first layer but it is barely visible. Consider too that this is the first layer of darks. since i was short on time, i did not do the darks in the hair. when i get to that, i will try to emphasize the sort of follow the dots method I use in this. I wont paint a lot of strands, instead, i will mark some of the deep hairs that are in deep shadow, which form shapes in the hair patterns. Then i will begin to put the hair puzzle together. in general, though, my next step will be brights. i will be as stingy with painting areas of brights as i am with darks. This is because i do not want big table top areas of flat white. The face of every human is made up of muscles and planes and bones and turning toward and also away from the light. it is all this which makes up the likenesses we paint..I find it fascinating and challenging. it will be our mission to learn this concept that a bright has edges that fade and darken, not flat areas of all one brightness. it is easier at first to paint only the very brightest (holding the truly brightest for highlights at the end). it will be easier to show you how adding the layer of skin (half paste of gell and white) will begin to modulate the brights and darks allowing the structure of the skeleton to form the likeness by the use of light. Hope you are all feeling better. See you Tuesday. Diana
I dont like hurrying
This stage is so important. Of course it is the end of the day, i need to go cook supper, but i still want to do these steps correctly. i cant stop and wait till tomorrow because it is important to soften these shadows and features while paint is still wet. i want you to understand that it is easier to work with soft forms rather than lines. This is the best time to begin this process. With this technique, I go back and forth between darks, not too dark, and what I call brights. at this stage, i have transferred the drawing. i used the same paint as the under layer but since the canvas was rubbed down, it looks lighter. Now, we are going to establish some of the form and shadows, but do NOT make the mistake of painting darkly or with heavy coloring in. Any paint will need to be transparent and thinly applied. you can see i painted only small areas and lightly. Now i use a fan brush to softly buff the surface. This removes the brush strokes and readies the surface for the next process.
Preparing for transfer
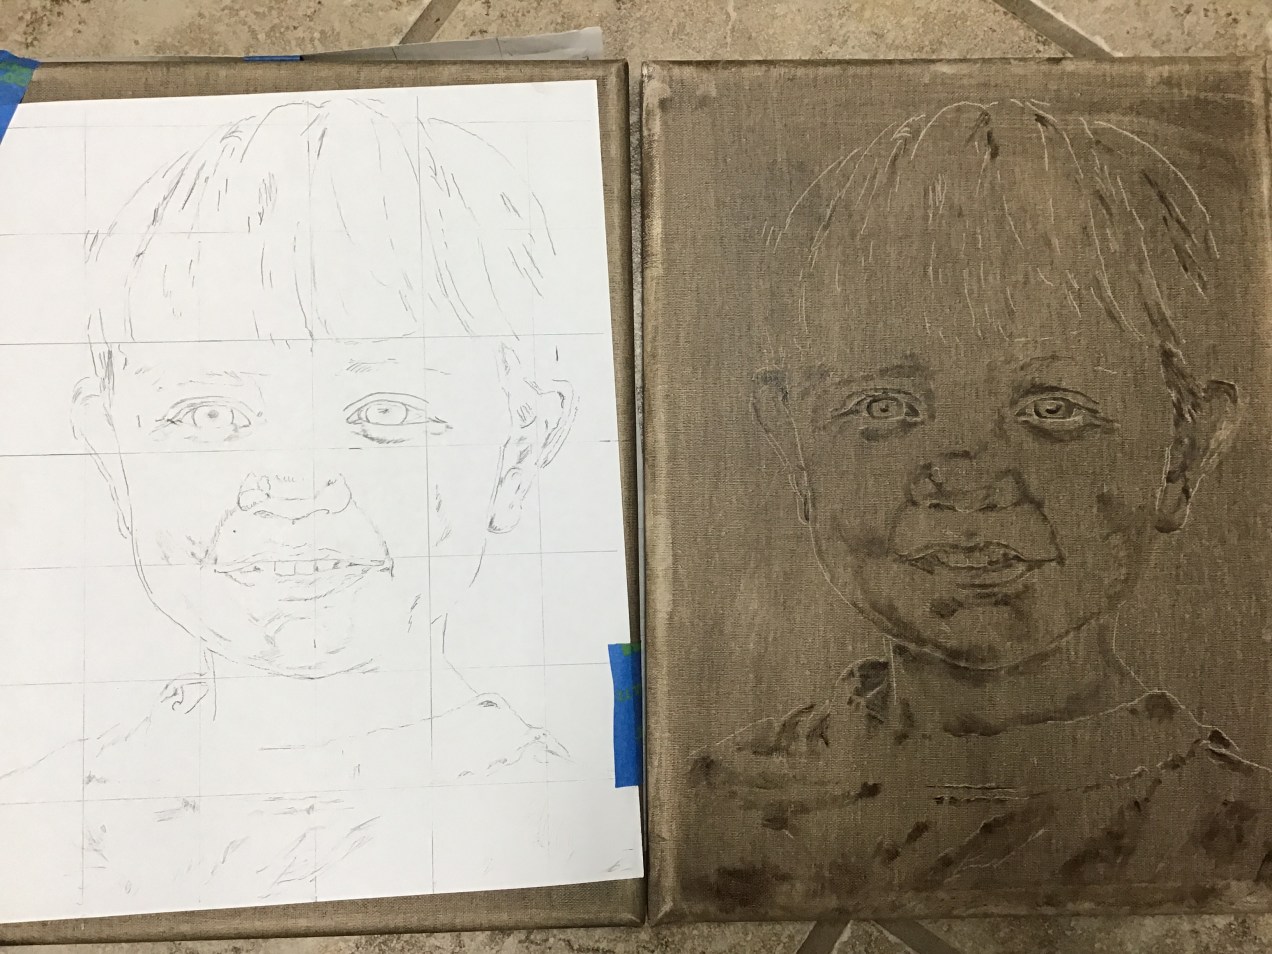
This may seem strange but i use a medium size sheet of tracing paper. Mix the same color which was used for the imprimatura or first layer. Spread a very thin layer onto the tracing paper. be sure there is not too much paint or it will cause messy dots all over the canvas. place this paint side down and put your image on top. Use whatever works to go over the drawing, being sure not to miss anything. Always be sure to mark your image and canvas in order to realign it if necessary. i will try to take another photo for this demo.


Students request more info
I thought I would get back to my art sooner. I ask your indulgence as I find it more challenging than I thought to settle back into a routine after the death of our grand daughter. I began this week with an early morning funeral mass for a friend and two weeks ago a long time friend and neighbor completed her time here with us as well. My sympathies go out to you also because this is happening more than we realize.
I have continued weekly classes for students who desire more intense study, or even those who are learning the basics. These people are talented artists who have just not learned portrait painting. They are doing great but crave more detailed information. I will do my best to post a detailed description of each step as I proceed with my grand daughter, Sophie’s eleven year old portrait. It will be a slow process because of at least two events. One is Passover which I observe and also will have visitors during this time. The other is the big show at SAMA, Loretto. We have already delivered thirty two paintings to the SAMA museum on the campus of St. Francis University. It will be a busy time.
A photo will accompany this blog. It is to show the linen panel, actually a 12×16 oil primed stretched linen canvas. my students often have trouble doing an imprimatura, which is just a toned oil layer, brushed on and wiped down with paper towels. I used burnt umber mixture withultramarine blue until the color was quite dark. Then as i wipe it down, the color is usually a warm brown. My students often end up with a blotchy black that is hard to work with. It absorbs into the canvas and also wants to resist the next paint layers. it may be because of high pigmented paint or because of lesser grade canvas. I cannot be sure. Aim for something similar to what you see here. As for the image used, I get the best results from a simple image with good lighting. It is possible to draw a good likeness freehand if you have a lot of practice at this. If you decide to use a photo reference, you must study that on your own and understand the complications so you overcome or avoid them. Try to hear this clearly; the image must be a precise image but not necessarily detailed. It is most important to have the measurements precise. You will see that I have used a grid to aid in correct likeness. I choose this because it saves time, a valuable comodity, and it can be very precise if done correctly. Whatever method you use, it is important to make every mark in the drawing as correct as possible. A simple drawing works for me and I study it to make corrections before i transfer it. I will post another image and more instructions as I go.
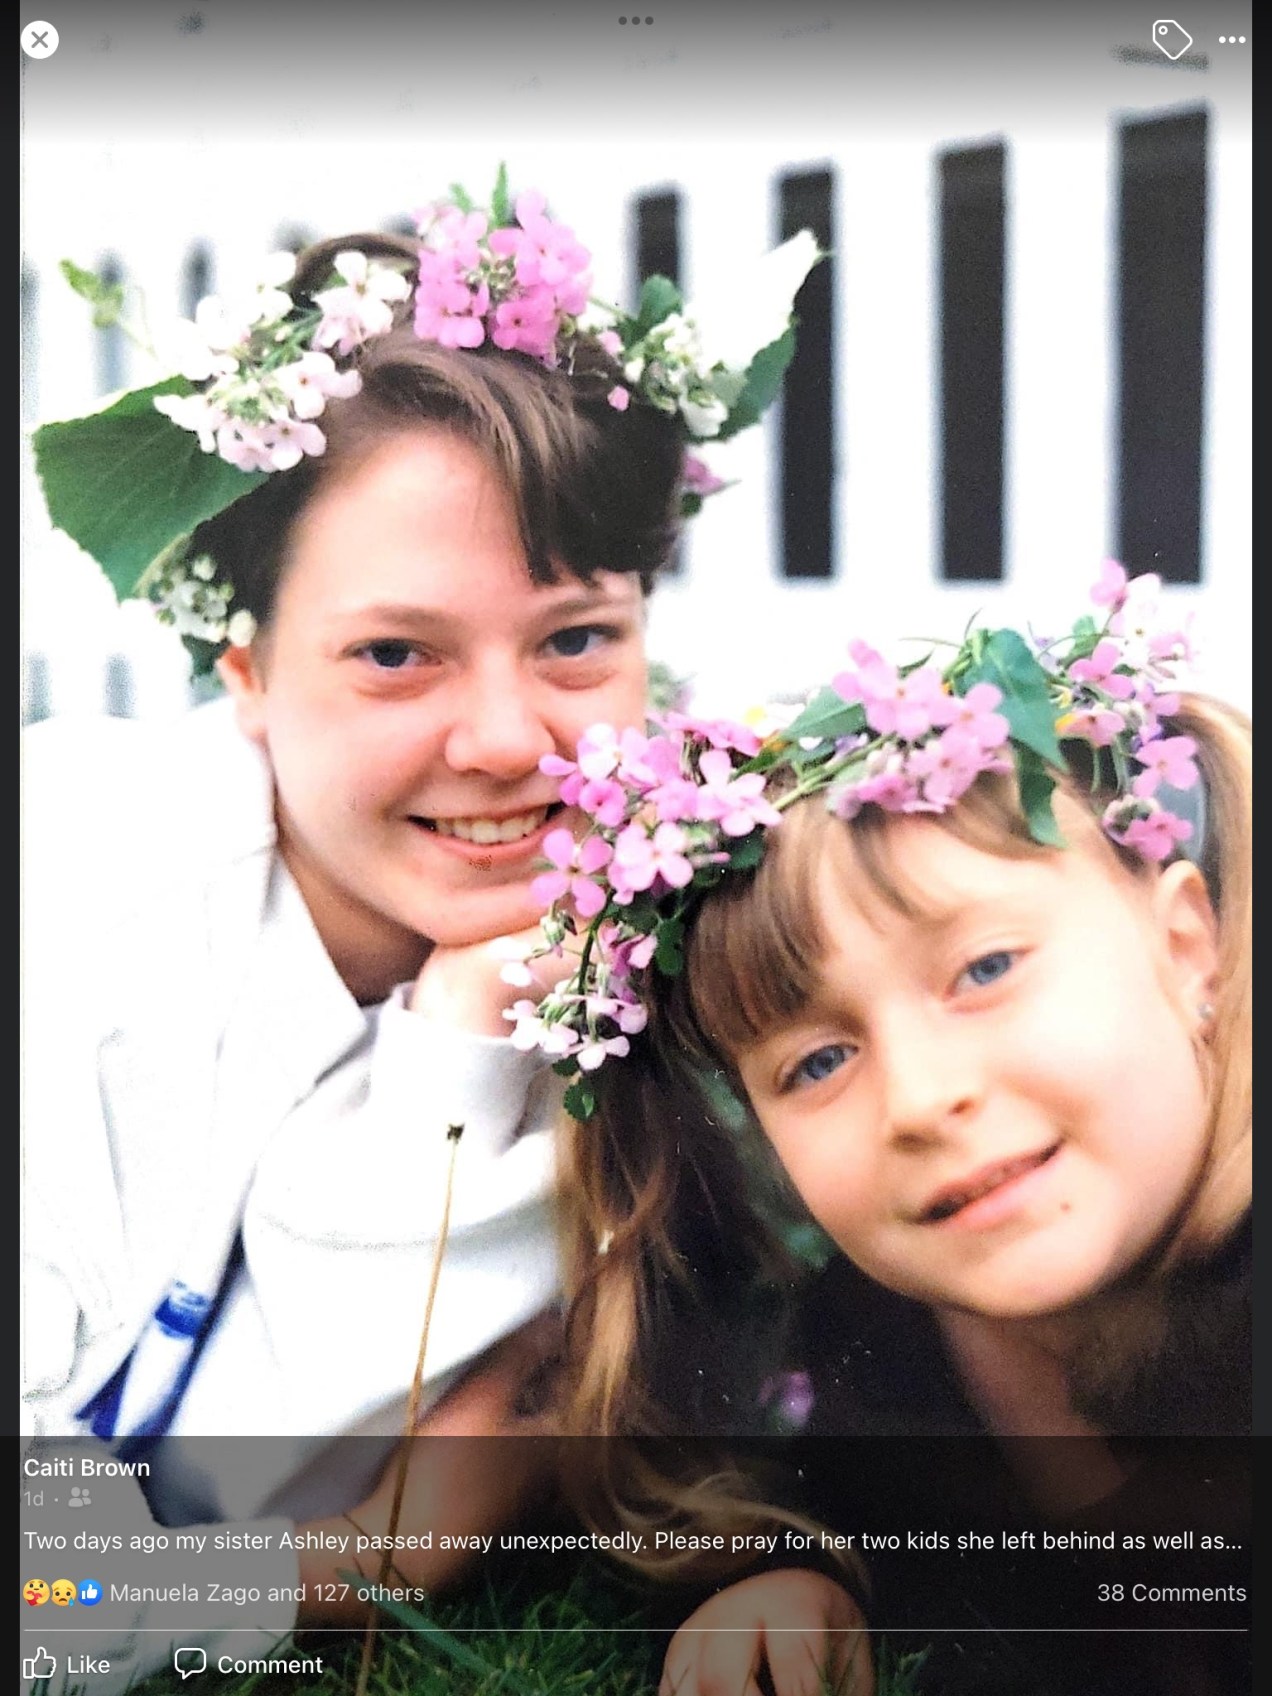
She slipped from here to God
Our grand daughter, Ashley, 37, mother of two young boys, and wife of minister, Lee, died last Monday evening. she had been hospitalized for several days because of abdominal pain but was due to be released. although it was not detected, she had a blood clot caused by covid. when it moved to a vital area, the doctors attempted to resuscitate her but were unsuccessful. Her younger sister, Caiti and her brother, Tyler spoke at her services as did so many of the large group attending. it is too sad for words.
i will return to this blog and to my work as soon as i can. Blessings and hug your loved ones. Diana
Back to work
During December and Jan 1 the portrait class was put on hold so people could have this time with their families. I managed to finish a double portrait commission for a new acquaintance and that went very well. I used my time to begin cleaning my sewing room, which involves sewing things i have cut out. In the spring of 21 I sewed a beautiful navy blazer lined with a navy blue floral print, just perfect. I had bought sufficient yardage so that there was enough to cut that lining, a sun dress and a vest type blouse. Since I was not able to get the pattern i wanted, that meant it was necessary to contrive and fit the dress as I imagined it, a very time consuming and difficult project. The dress will not take too much work and the blouse should be reasonable too. The slacks are complete so at least I have a wearable outfit if i need it. Finally, Jan. 12, i am able to come back to my studio. I know the photos dont show much, but this little guy is brightening up. I may add several more layers to the flesh, it will depend on how it looks as it dries. There are a number of unfinished works to get back to and i want to concentrate on improving my skills. That means it will take concentration. I will not begin this process until after the visit of our AFS daughter. she is now a woman without a home. Her three month visa will allow her to process the necessary requirements to hopefully make a new home here, near her brother in Texas. Two of my family have Omicron but are nearly back to normal. There have been a lot of recent deaths and Bruce attended his cousin’s funeral in Pittsburgh yesterday. I made the reluctant decision to not go because Nelly will be here in about a week and I don’t want to catch anything. It seems That is about all there is to tell you for now. Don’t forget, there may not be much activity here until after our visitor comes. have a blessed day, Diana

Almost finished
Friends, photos just do not show true. The surface of this little guy’s skin is pink and bright, the dark skeletal forms are deep and just barely influence the likeness but do not look dark. Today covid and other illness prevented my students from attending so I got this advanced. I will finish it soon. Also, the commissioned portrait is nearing completion. I cant predict how long till the finish because the work left is mostly detail. You will see what I mean when I show you, but I wont do that if the client objects. hugs and shalom, Diana

Photos just are not accurate
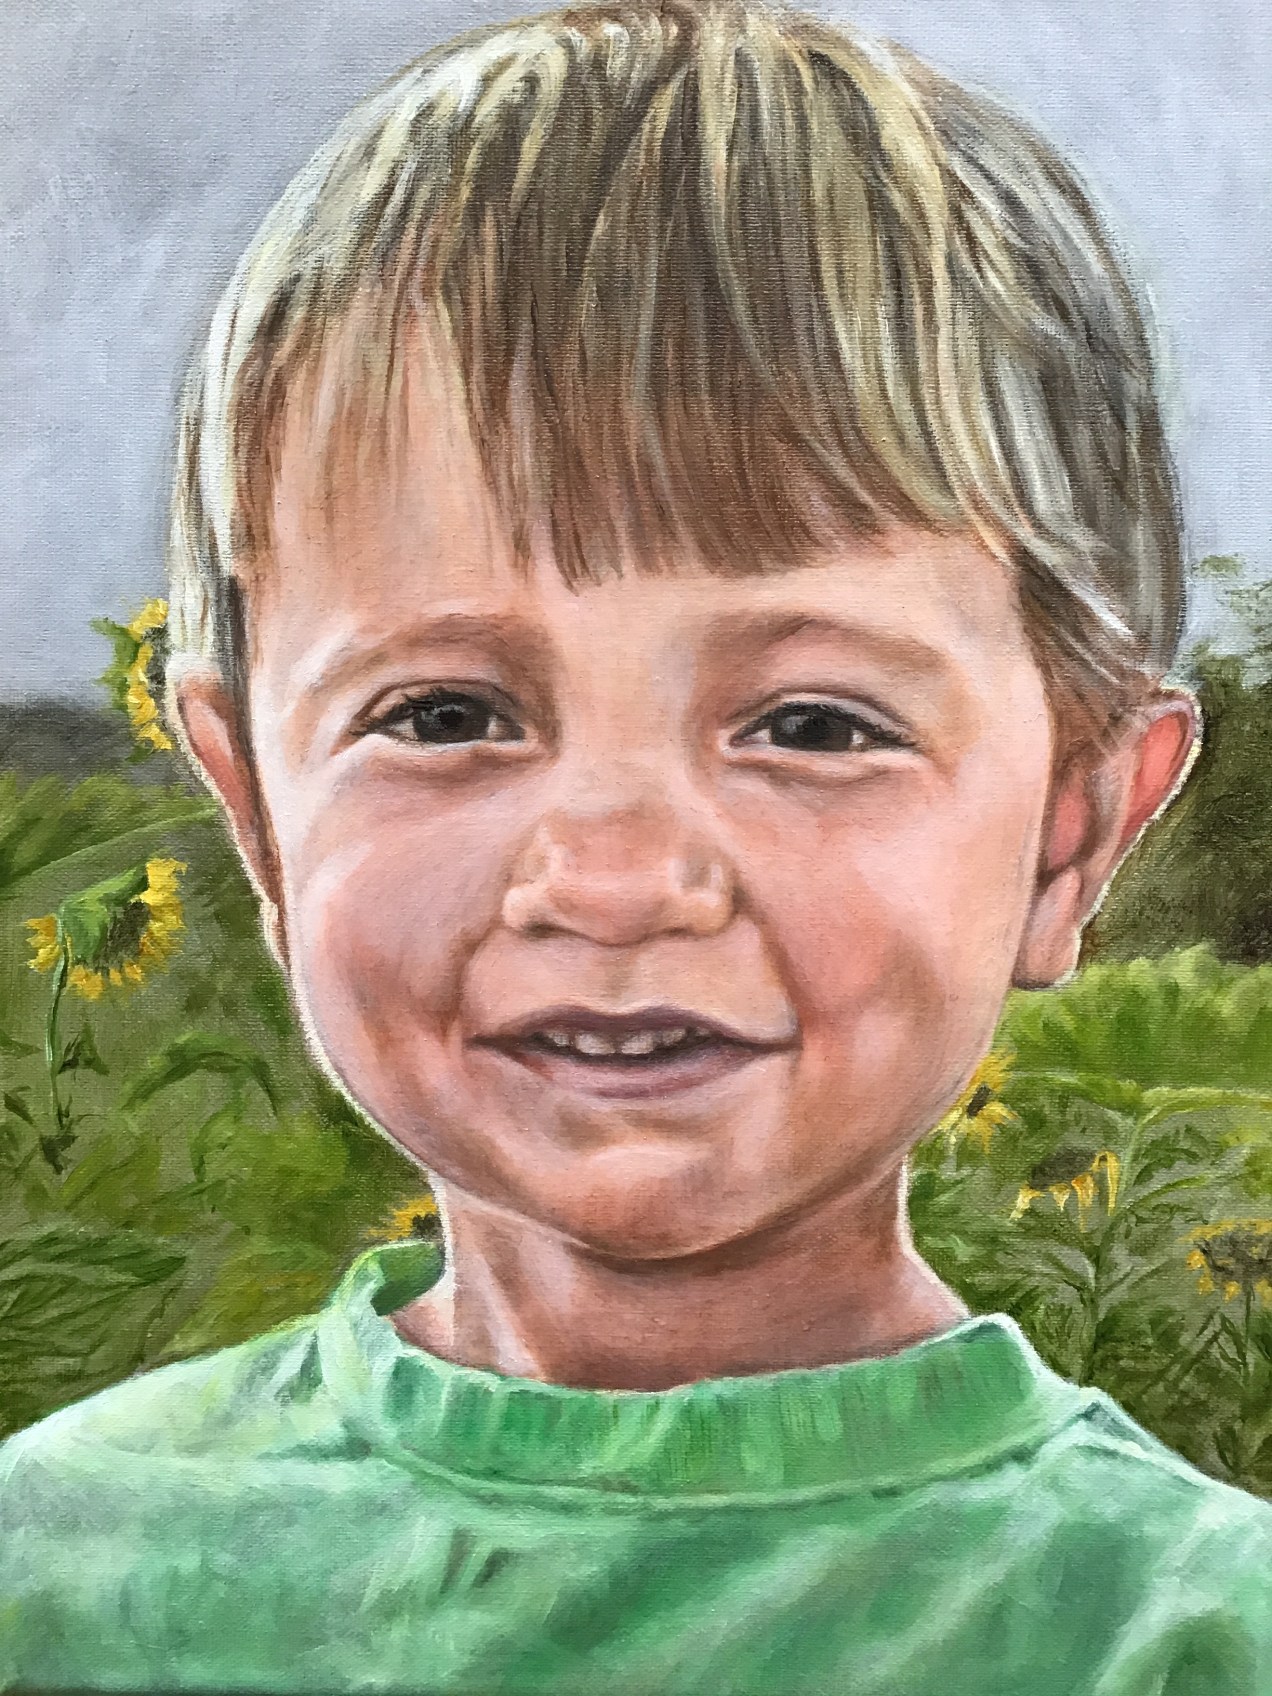
I offer apologies for posting less frequently. I am working on a special commission and teaching a portrait class twice a week. Both are intense and require focus and time. This little portrait of my great grand son has been in line waiting for my attention. I want to mention that my ipad camera seems to darken the skin tones and exray right through the image to the under painting. it looks much smoother than this photo shows you. Even so, I will do at least one more layer and more pink glazing. i doubt you can see it in the photo but the eyes are really nice. The sky reflected in these brown eyes and when i put this on, it looks so nice. I barely suggested the sunflowers and i an happy with the effect. When this is dry I will add some darker greens. It will also show improvement when I paint the hair.
My miniatures got an award of merit at the South Western Pennsylvania Council for the Arts Show at the SAMA in Ligonier. This concludes my show schedule for the year. I was rather surprised to see an award for the miniatures because I just didnt expect to get the juror’s attention with this. I am very happy to end up the year with this award and recognition.
My class of seven is down to a regular five because of illness which i believe was covid. Every day that i taught I did a thorough inspection of my own health before hosting these students. So far, so good, in-spite of seasonal allergies. This is an enriching and happy place to spend time. The students LOVE doing/learning portrait painting. They are amazed to see their results. I enjoy the teaching tremendously because the results are so positive. We are switching to once a week as long as the weather holds.. So for now, shalom. Diana
Layers
Layers may seem like a slow way to go but the result is luminous supple skin surfaces that look alive. Right now there are seven students in my portrait class who are finding out the joy and excitement of achieving this quality in their first portrait attempts. it amazes me how they all come to class with such eagerness and leave expressing their desire to return quickly for more. They work diligently and ask questions. if they are discouraged, all it takes is me explaining that they are on the right track and they respond with a positive attitude and a willingness to keep faith that they are still doing this correctly. I explain that they must develop the ability to see ahead to the look they are wanting, that this will only happen well when the light can go through the transparent layers and bounce back to the eye. I tell them they also can make the choice to paint directly, with all the colors mixed each time they come to the easel. but the effect, although pleasing, even beautiful, will be flat and only realistic in an illusory way. This indirect method is also just paint, after all, but it has much more life when done well. Here I show the layer I hurriedly apply after the students leave because i never have a minute to paint when it is better to use the time instructing and explaining. It is a privilege and a pleasure. I feel blessed.
Layers
Sometimes when my students are getting to the more challenging parts, i send an encouraging email with examples of my work. i am doing this portrait as an example in class but my time advising takes away from the time to demonstrate. today i did a full layer with a couple of photos to send off to help them as they work. i will post it here as well for others who are studying this method.
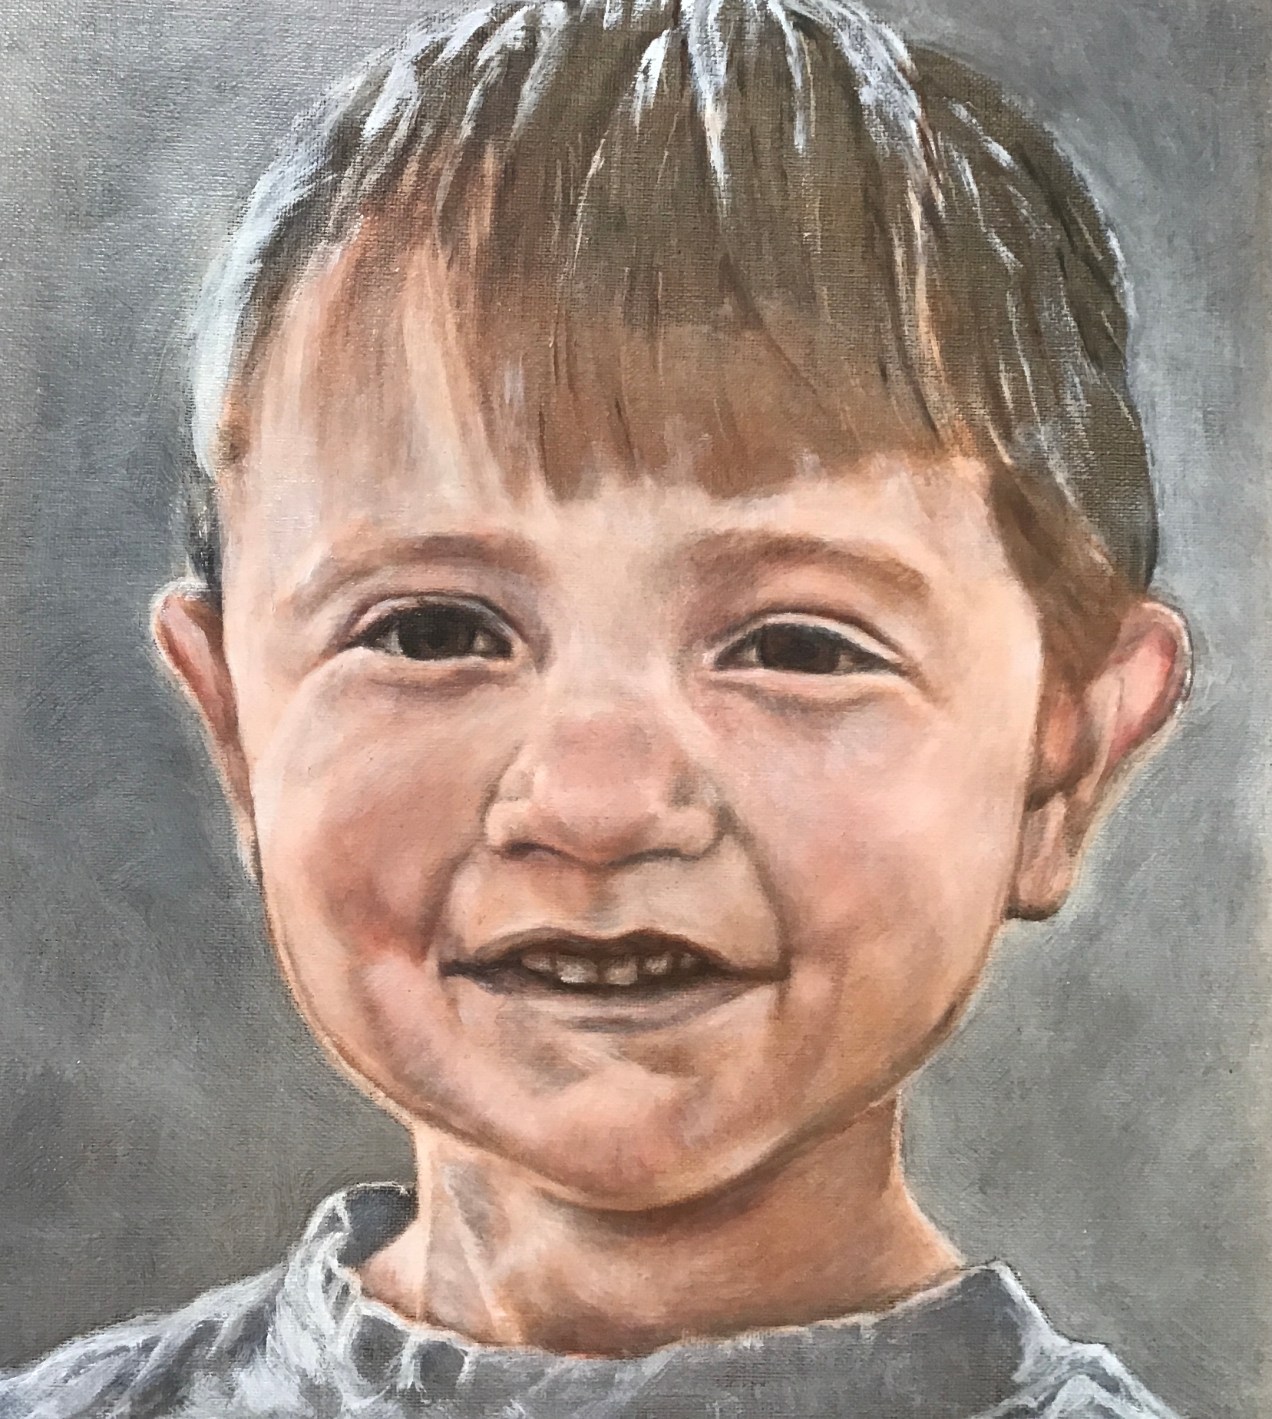
Missed one photo
Here is my great grandson as i demonstrate for the portrait class. i missed getting a shot of the skin application. after we find all the brights and paint them into the portrait, we let it dry completely and then apply a halfpaste mixture of titanium white with equal amount of gel. once we buff this down well, remembering to wipe our brush as it picks up excess paint, then the image shows through. the students are all very occupied and intent on learning. they are in such good spirits and often even giddy with delight because they seem so surprised that they are getting good results.
i will take a second to appologize for the errors in the script. A few weeks ago, changes were made, as happens frequently, so that now my typing is not responding in the same way it used to. i get no automatic capitol letters at the beginning of sentences and even my typing does not show up on screen for a delayed period of time. this is a bother to me but i dont have time to get excited about it. i even dont have apostrophies! what is the world coming to. well, im going back to painting. there is enough to keep me busy with this! today, Bruce and i stretched a linen canvas for a commissioned portrait. then, when i was painting the imprimatura layer, i see this flaw in the linen right down through where the face will be. i cannot paint a perfect portrait on flawed linen so i must remove the canvas and do it all again tomorrow, i will be sure to check it before cutting and stretching. i ahve never had this problem before so have never experienced this. i did examine the linen but the flaw did not show untill paint was applied. so that was my day. i will see what tomorrow brings. shalom, Diana

Today, establishing the brights
Our class worked hard today. Each student listened intently and asked a lot of good questions. everyone was cheerful in dealing with challenges. Each one is doing so very well so no one should feel discouraged and i dont think they are. it is a process and they surely want to see ten steps down the line but i am trying to teach them to visualize and see what the portrait is going to look like so they can get it to that point but, not in an instant. ok, im exhausted. till Sunday, Diana
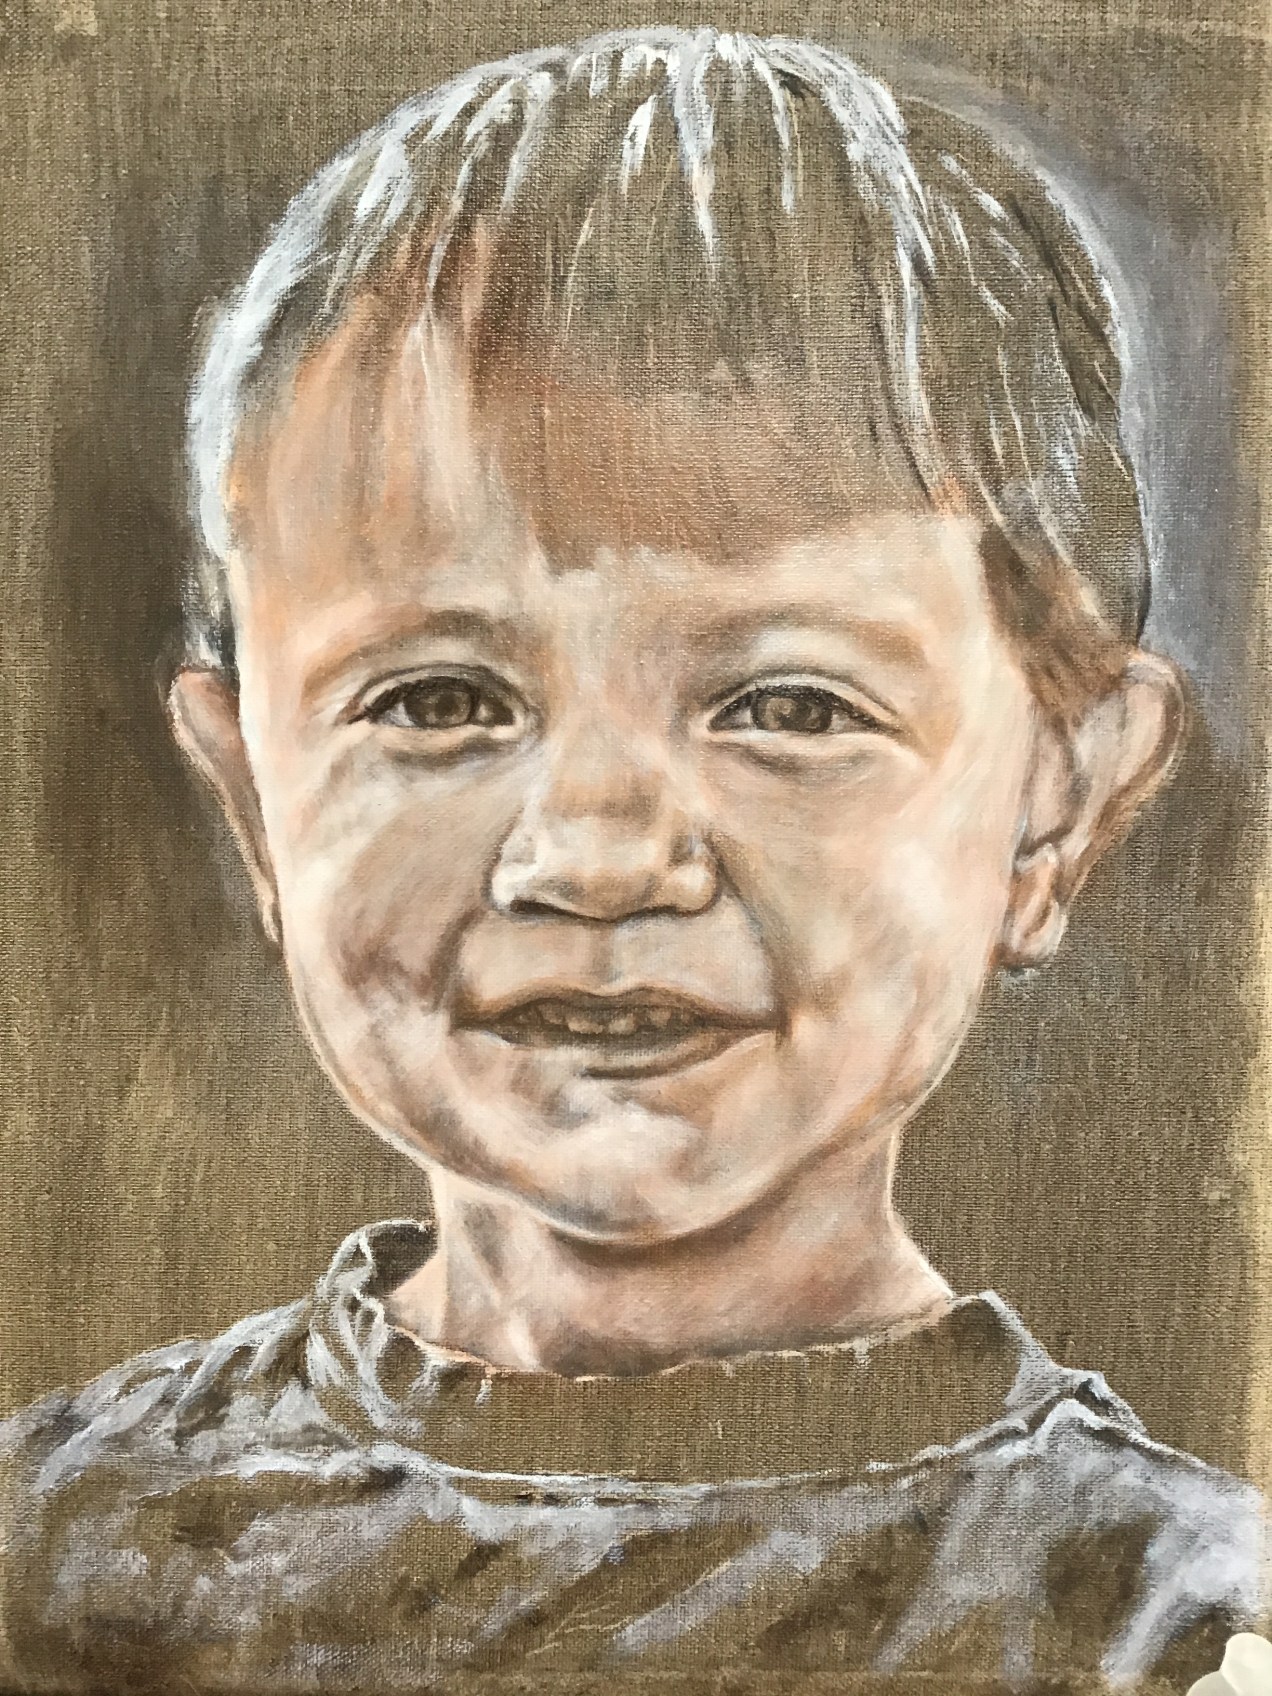
Anyone recognize him yet?
So, the portrait painting class i began teaching today has eight students. each is working on an image they brought. i decided this would be a good time to start my great grandsons portraits. i began with the youngest.
Each of the students want seriously to learn how to paint the portrait of someone they love. The time goes by so quickly and it is very rewarding for me to see their faces and hear their comments. I am blessed to have this opportunity to pass on what i have learned.

Not redundant
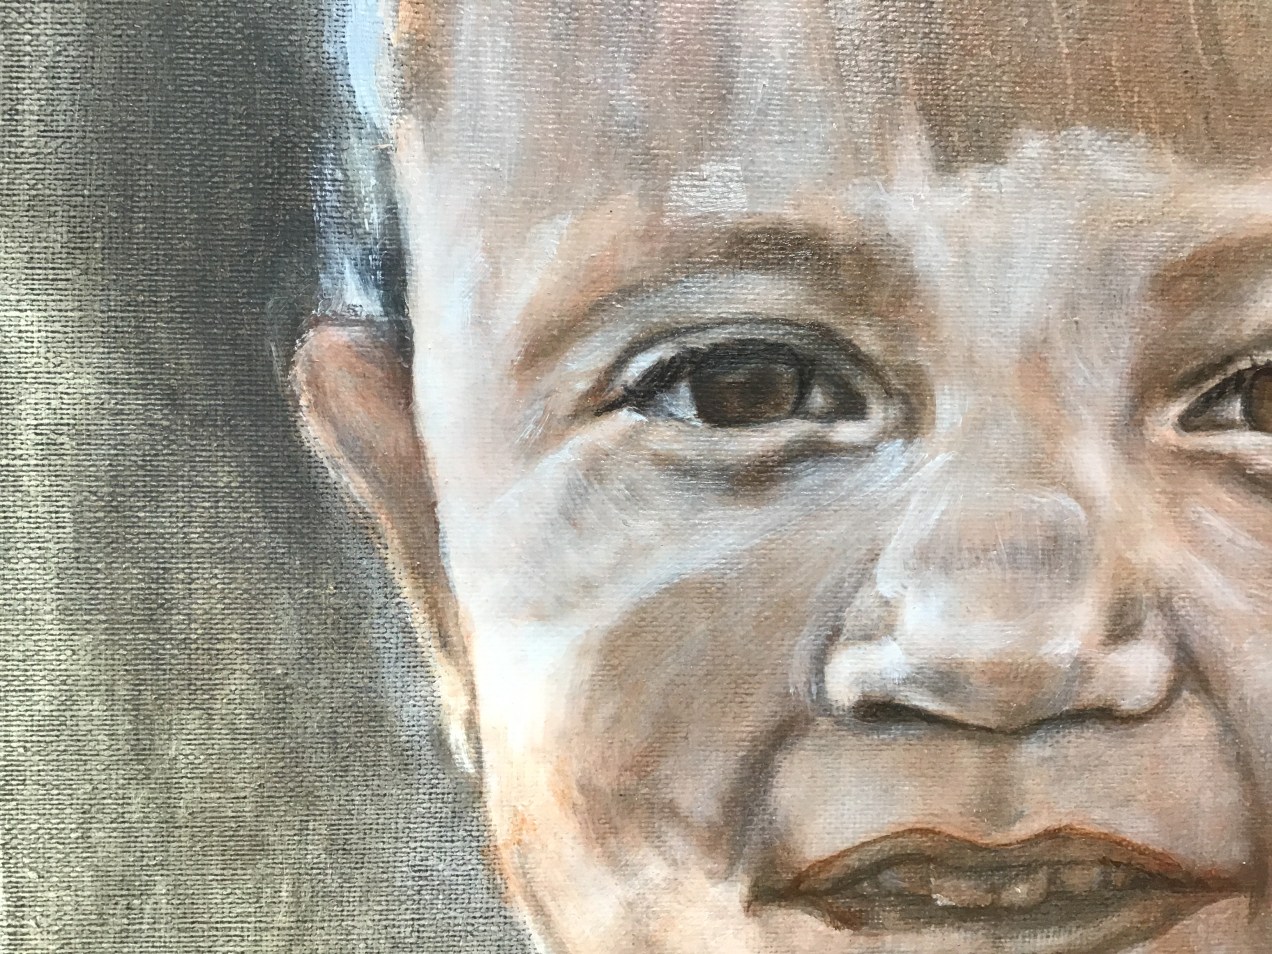
I show these photos so you can see how the flesh application works. The grasialle under everything gives the deeper color to the flesh and the light falls on the protruding surface as shown by the application of white and naples yellow. Of course, the more layers, the more supple looking the skin. This is harder to achieve in the shadows sometimes. When we work with a challenging subject, the results are more rewarding. I will be teaching a portrait class,(sorry it is full) so I will be very busy but I will try to post something from this.
Diana

I’m usually not in a hurry
Actually I refined my methods to fit into my possibilities that are always modified by pain, appointments and the number of pieces I am working on at one time. This image is, of course, showing flesh tone, applied and then carefully smoothed into the weave of the canvas where needed. Some artists apply a lot more paint, which I do toward the end. I find that my flesh tones look more supple and lifelike if I keep them thin as much as possible. At the moment I have a pending commission, this subject with the three figures, a portrait class, a still life and two unfinished paintings that I sat aside several years ago. For now, have a great day painting. Diana
